Part 2: Services, Services, Everywhere!
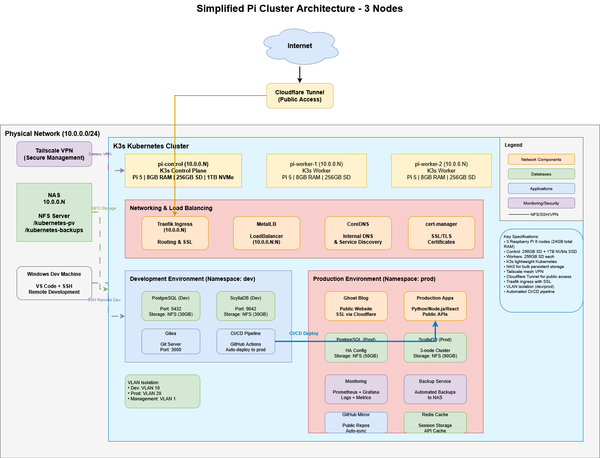
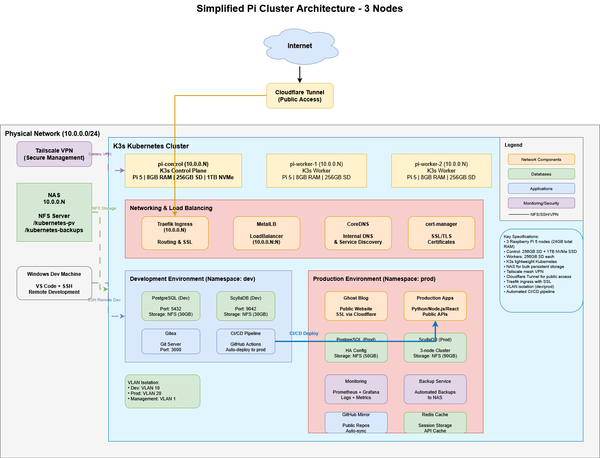
The concept has become reality. I am hosting real services from a three-node Raspberry Pi cluster. I have traffic flowing through Cloudflare and routed to K3s services without needing to set up port-forwarding or complex router configurations.

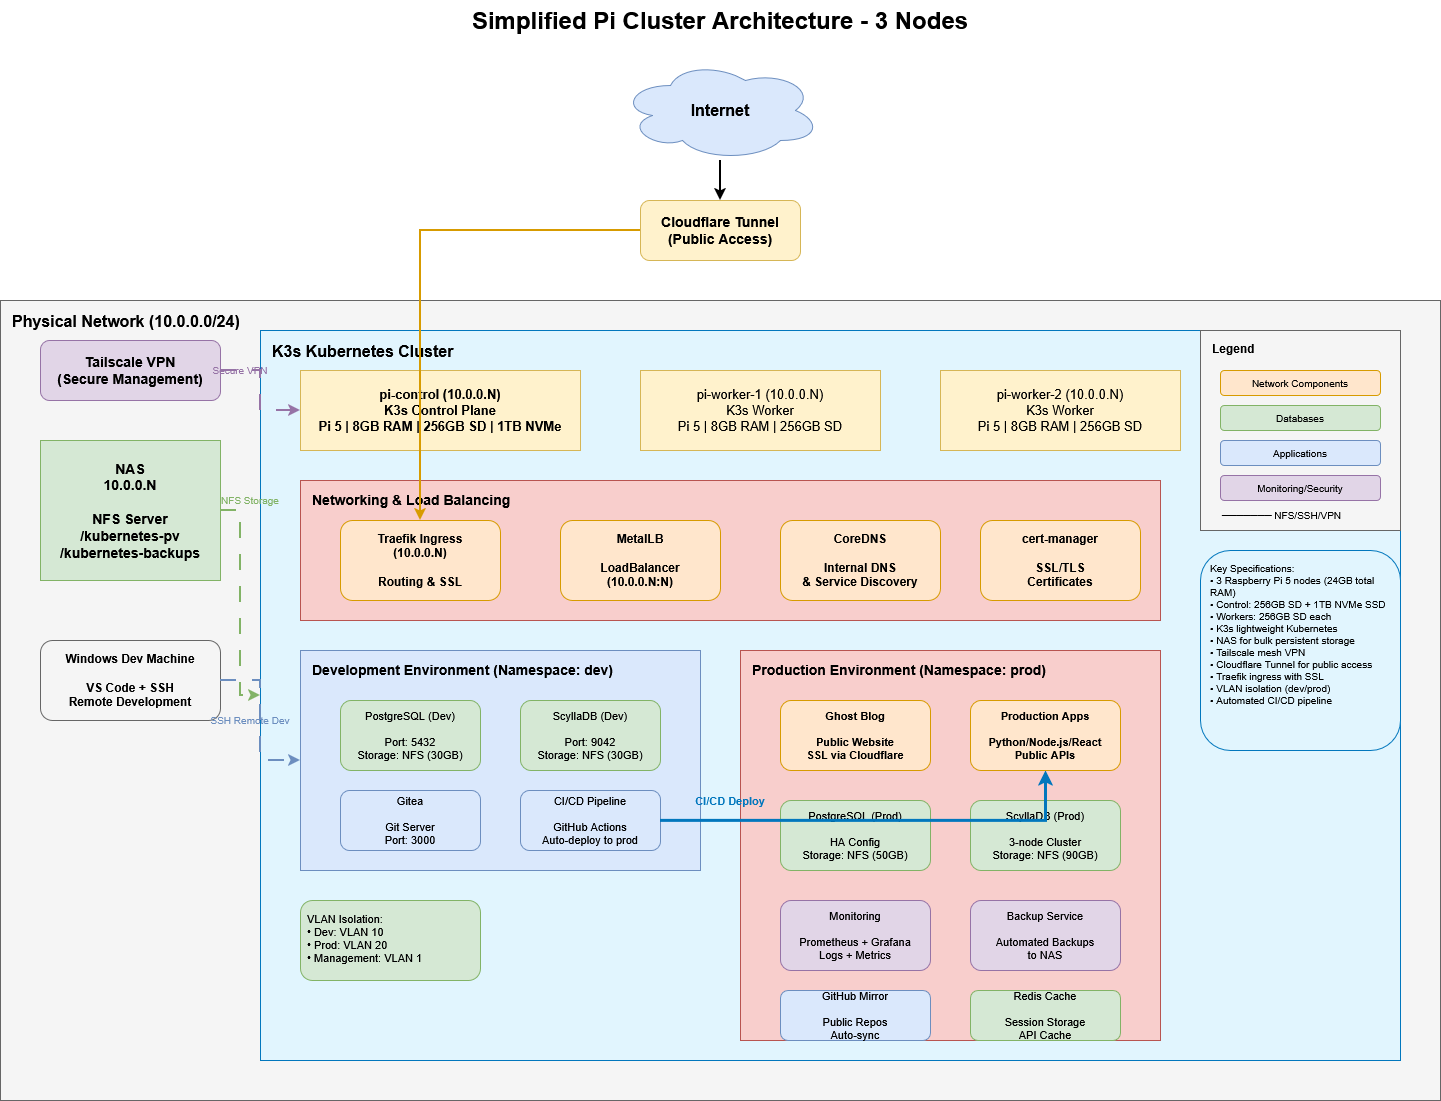
Table of Contents
Working on the configurations in Part 2 has been an incredibly frustrating, but incredibly rewarding experience. From the first milestone of getting the hardware built and core services running, I’ve been quickly adding to that foundation. In some cases, even more than what I had expected. At times, the configuration challenges seemed insurmountable. But time and again, I was able to troubleshoot with Claude and in some cases end up even better than the original plan.
The AI-enhanced process of troubleshooting I observed in the initial build was magnified in this phase of the implementation.
As I worked through implementing specific services, very simple things turned into large problems. The first milestone of Part 2 was to get my network ingress/egress foundation configured. To accomplish this I would be leveraging Cloudflare’s Zero-Trust Tunnels, and Tailscale—a VPN-like method to securely extend my network to my devices where I am.
I deviated from my original plan to launch the Ghost blog, because I was brought down a path of needing better management for the infrastructure configurations and Pi Cluster services. An important example of this was resolving the NFS permissions issue and finalizing the storage strategy. These things needed to be done before implementing Ghost--one of the cornerstone services.
A final core philosophy I needed to finalize--and ensure became part of Claude’s implementation context--was establishing a Kubernetes Secrets strategy. As I got further into the services that were being deployed, the administration and service logins needed to be managed effectively. In many of the manifests from Claude’s implementation plan the passwords were plain text and the potential for them to be compromised was prevalent.
These diversions and adjustments were important, but some turned into rabbit holes that took hours. As frustrating as it was at times that Claude hadn’t recommended it from the start—I can’t count how many times it replied “You’re right! I hadn’t considered that!”—it consistently resolved issues and kept the project moving forward. Many of the issues were well beyond my current expertise, but iterating with Claude felt natural and I was learning a lot about the details of my architecture.
Lessons Learned
Many of the lessons learned are correlated to what I encountered in Part 1. At times I was lacking the “why”, or questioned a decision or suggestion in the plan, and that led to Claude enhancing or adjusting as I proceeded through the implementation steps.
A few important lessons from this phase revolve around the approach I took to have Claude create a comprehensive implementation plan up front. A common best practice with Claude (and other AI tools) is to provide all the information and requirements in one shot so it can map out the most comprehensive plan. I see the benefits of a "one shot" approach in this project to get to the simplified architecture—but the later steps in the plan have had significant changes due to adjustments to the design.
Large scale implementations should have room for iteration and breaking down into smaller, more manageable tasks. You must have a strategy to manage through change and trace the impacts of decisions to later milestones.
Deviations and Diversions
One of the first major adjustments I made occurred during the implementation of CloudFlare and Tailscale. In Claude’s plan, both of those services were actually not deployed via K3s. They were going to be bare metal directly on pi-control. I found that odd and as I probed, Claude identified that there were off-the-shelf K3s deployments ready to go. I asked for pros-and-cons and decided there would be benefits to them being deployed along the other cluster components to make future configuration easier. Some determining factors were: They would be stable services that K3s would restart and monitor if there were issues, communication between the other K3s services would be more seamless, and I could source-control the configuration.
CrashLoopBackOff
Throughout Part 2 it became a common occurrence to kick off a K3s command to launch a service only to see the status go into “CrashLoopBackOff”. I would then begin trouble shooting with Claude—pulling logs, providing them to Claude, getting a configuration change or request for more information, and eventually arriving at a resolution.
One of the first examples was deploying Tailscale. Claude’s original manifest had an attribute to include Tags with the auth key. If you didn’t set up tags while creating the auth key (which I didn’t), providing an empty tag attribute was enough to cause authentication issues. Claude quickly saw the error, provided an updated manifest, and I re-applied and restarted the pod with success. My ecosystem isn't complex enough to warrant a tagging strategy.
Infrastructure as Code
One of the appealing things about Kubernetes is that my cluster architecture and services can be managed through source-controlled configuration files. These YAML manifests contain the "what" and "how" the service should run, and K3s manages the rest. This “declarative” concept essentially says “The service must look and operate like this” and K3s will find a way to make that happen. If the service falls out of that state, K3s will restart it, adjust it, or manipulate it to get back to the declared state.
What this means is once the configuration manifests are stable and source controlled, deploying and managing a whole suite of services becomes very easy.
A spoiler for future posts—but I am now feeding my infrastructure details as context to Claude Code to be able to have it design and develop based on the exact services, architecture patterns, and storage or secrets strategies that I’ve defined. This enables Claude Code to not only build the app, but package it and deploy it as a K3s service right into my cluster architecture. It even runs through it's own troubleshooting steps applying the corrections until the services works. More to come on this in a future post.
Part 2 - Outcomes and Updated Services
After working through the following activities, my Pi Cluster is now able to host public-facing services and I have the foundation for self-hosted repositories to operate Infrastructure as Code workflows.
NFS Solved!
After Part 1, I was tracking a medium complexity issue: My NFS storage was mounted as NFS 3 which posed potential risks for stability of services. One of the most important services would be the MySQL server deployed to NFS for the Ghost Blog service. Before I set up Ghost I wanted to ensure I had exhausted all troubleshooting steps. Working with Claude through my configuration, logs, and manual tests we found that we could manually mount the shares as NFS 4.1.
pi@pi-control:~ $ nc -zv 10.0.0.5 2049 # This is the static port for NFS 4.1
Connection to 10.0.0.5 2049 port [tcp/nfs] succeeded!
pi@pi-control:~ $ showmount -e 10.0.0.5
Export list for 10.0.0.5:
/kubernetes-pv      10.0.0.0/24 # The Persistent Volume share on my NAS for nfs-client and nfs-db Storage Classes
/kubernetes-backups 10.0.0.0/24 # Will be used for scheduled and ad-hoc backups (databases, configurations, app data, etc.)
Claude identified that we could pass mountOptions parameters in the nfs-provisioner configuration to force it to the NFS version we wanted
helm repo add nfs-subdir-external-provisioner https://kubernetes-sigs.github.io/nfs-subdir-external-provisioner/
helm repo update

helm install nfs-provisioner nfs-subdir-external-provisioner/nfs-subdir-external-provisioner \
  --set nfs.server=10.0.0.5 \
  --set nfs.path=/kubernetes-pv \
  --set storageClass.create=false \
  --set storageClass.provisionerName=cluster.local/nfs-provisioner-nfs-subdir-external-provisioner \
  --set nfs.mountOptions="{nfsvers=4.1,hard,noatime}" \
  --namespace kube-system
Success! Now the K3s NFS storage classes would be set up on the appropriate NFS version! The NFS Provisioner lives on pi-worker-2 and you can view the direct mount and see NFS 4.1 as the active version.
pi@pi-control:~ $ kubectl get pod -n kube-system -l app=nfs-subdir-external-provisioner -o wide
NAME                                                              READY   STATUS    RESTARTS   AGE   IP          NODE          NOMINATED NODE   READINESS GATES
nfs-provisioner-nfs-subdir-external-provisioner-7d95d86b9fqbtc5   1/1     Running   0          13d   10.42.2.4   pi-worker-2   <none>           <none>
pi@pi-control:~ $ ssh [email protected]
pi@pi-worker-2:~ $ mount | grep nfs
10.0.0.5:/kubernetes-pv on /var/lib/kubelet/pods/a90a694c-dc5e-4976-9947-c7d340d24b0e/volumes/kubernetes.io~nfs/pv-nfs-provisioner-nfs-subdir-external-provisioner type nfs4 (rw,noatime,vers=4.1,rsize=1048576,wsize=1048576,namlen=255,hard,proto=tcp,timeo=600,retrans=2,sec=sys,clientaddr=10.0.0.12,local_lock=none,addr=10.0.0.5)
Cloudflare Configuration
Deploying Cloudflare was a deep-dive into several core principals that I now carry into each of my deployments.
- Always question AI! When I asked why the plan didn't use K3s it completely changed the approach.
- My questions also led to the first instance of really establishing a K3s Secrets strategy to securely manage things like the Cloudflare auth token.
- The reasons why something is failing K3s may be trivial, but may not be clear from the simple status monitoring.
- Trust the logs. Passing log details to Claude enabled quick fixes or logical changes that resolved issues.
The below is an excerpt of the implementation plan pivot and troubleshooting lessons learned from my work with Claude.
The original plan was to install cloudflared directly on the pi-control node as a systemd service. This followed the traditional Cloudflare documentation approach:
- Install the
cloudflaredbinary on the host - Authenticate with
cloudflared tunnel login - Create tunnel via CLI:
cloudflared tunnel create pi-cluster - Store credentials in
/root/.cloudflared/and config in/etc/cloudflared/ - Run as a systemd service
Problems with this approach:
- Configuration files stored on host filesystem
- Credentials in plain text files on disk
- Single point of failure (only on control node)
- Requires SSH access to update configuration
- Not managed by Kubernetes (separate monitoring/restart mechanism)
- Manual backup and disaster recovery
Better Approach: Kubernetes-Native Deployment
After recognizing the limitations, I worked with Claude to pivot to a fully Kubernetes-native approach that aligns with infrastructure-as-code principles.
Key Strategy Changes
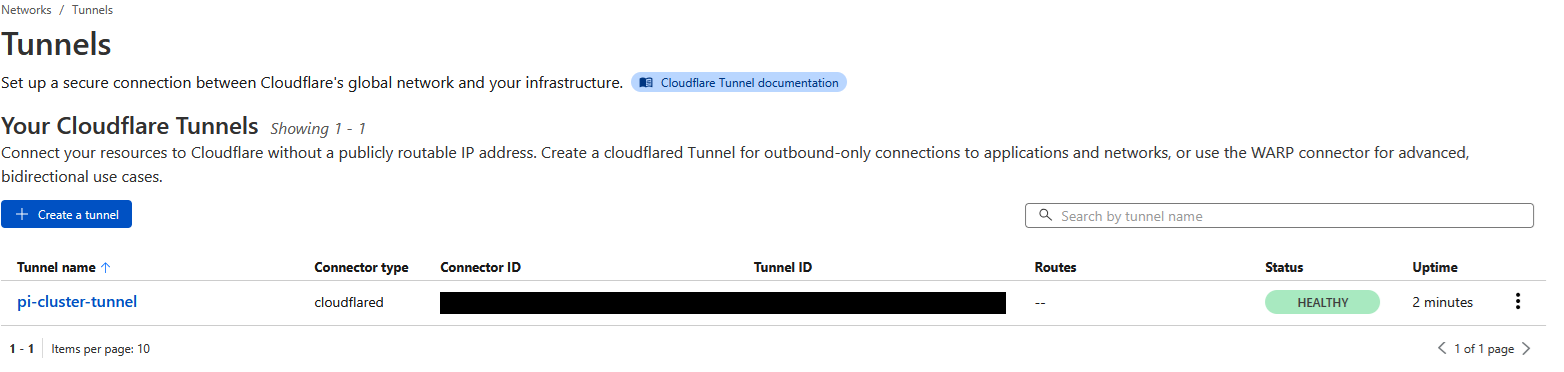
1. Tunnel Creation: Dashboard vs CLI
Old way: CLI-based tunnel creation
cloudflared tunnel login
cloudflared tunnel create pi-cluster
New way: Cloudflare Zero Trust dashboard
- Navigate to Access → Tunnels → Create tunnel
- Copy the tunnel token (starts with
eyJ...) - No local CLI installation needed
Why better:
- Token-based authentication (more secure than cert files)
- No host-level dependencies
- Easier for team collaboration
- Token can be rotated without reinstalling
2. Credential Storage: Files vs Kubernetes Secrets
Old way: Credentials stored in files
/root/.cloudflared/<tunnel-id>.json
/etc/cloudflared/config.yml
New way: Kubernetes secrets
kubectl create secret generic cloudflare-tunnel-token \
  --from-literal=token=<your-token> \
  -n cloudflare
Why better:
- Centralized secret management
- Encrypted at rest (if configured)
- RBAC controls who can access
- Easy to rotate/update
- Backed up with cluster state
3. Configuration: Static Files vs Dashboard
Old way: Configuration in YAML file
# /etc/cloudflared/config.yml
tunnel: <tunnel-id>
credentials-file: /root/.cloudflared/<tunnel-id>.json
ingress:
  - hostname: domain.com
    service: http://traefik:80
New way: Configure via Cloudflare dashboard
- Public Hostname tab in tunnel settings
- Point-and-click route configuration
- No config file to manage
Why better:
- Change routes without redeploying pods
- No configuration drift
- Visual interface for non-technical users
- Instant updates without pod restarts
4. High Availability: Single Service vs Replicas
Old way: Single systemd service on control node
sudo systemctl start cloudflaredNew way: Multiple pod replicas
spec:
  replicas: 2
Why better:
- Survives node failures
- Load distributed across cluster
- Kubernetes auto-restarts failed pods
- Can scale up during high traffic
Lessons Learned
Lesson 1: Health Checks Need Validation
The Problem: Initial deployment included liveness probes checking port 2000:
livenessProbe:
  httpGet:
    path: /ready
    port: 2000
But cloudflared's metrics server runs on port 20241, causing continuous pod crashes:
Liveness probe failed: dial tcp 10.42.2.6:2000: connect: connection refused
Container cloudflared failed liveness probe, will be restarted
The Fix: Remove health checks entirely - they're optional for cloudflared:
# No liveness or readiness probes neededTakeaway: Always verify health check endpoints match actual application ports. Don't blindly copy probe configurations.
Lesson 2: Logs Tell the Real Story
The key to debugging was reading the pod logs:
kubectl logs -n cloudflare -l app=cloudflared --tail=100 --previousCritical insights from logs:
- ✅
Registered tunnel connection- tunnel was actually working - ⚠️
Initiating graceful shutdown due to signal terminated- being killed by Kubernetes - ℹ️
Starting metrics server on [::]:20241/metrics- revealed actual port
Takeaway: When pods crash, use kubectl logs --previous to see what happened before the restart.
Final Architecture
Request flow:
Internet User
    ↓
Cloudflare Edge Network (CDN, DDoS protection, SSL)
    ↓
Cloudflare Tunnel (encrypted)
    ↓
cloudflared pods (2 replicas in cluster)
    ↓
Traefik Ingress Controller
    ↓
Application Services
Now I can add Cloudflare Tunnels to any K3s service that I want to be public facing and Cloudflare and K3s takes care of the rest.
Tailscale Setup
The Tailscale implementation allows me to work in my Pi Cluster from anywhere. This deployment was much simpler relative to Cloudflare, however it also had several important changes.
- This also had a pivot to deploy through K3s. The same benefits that drove the Cloudflare decision applied to Tailscale.
- Re-enforcing to Claude that I wanted to manage keys using K3s secrets further strengthened the secrets strategy.
- Initially the deployment was failing and--similar to Cloudflare--the logs held the key. The original deployment YAML had several extra environment variables for the Tailscale container and some of them were causing authentication errors.
- These were optional variable so Claude removed them, we re-deployed and the service was launched!
One final step in the Tailscale admin portal to accept the subnet routes and I was connected.

First Public-Service Test
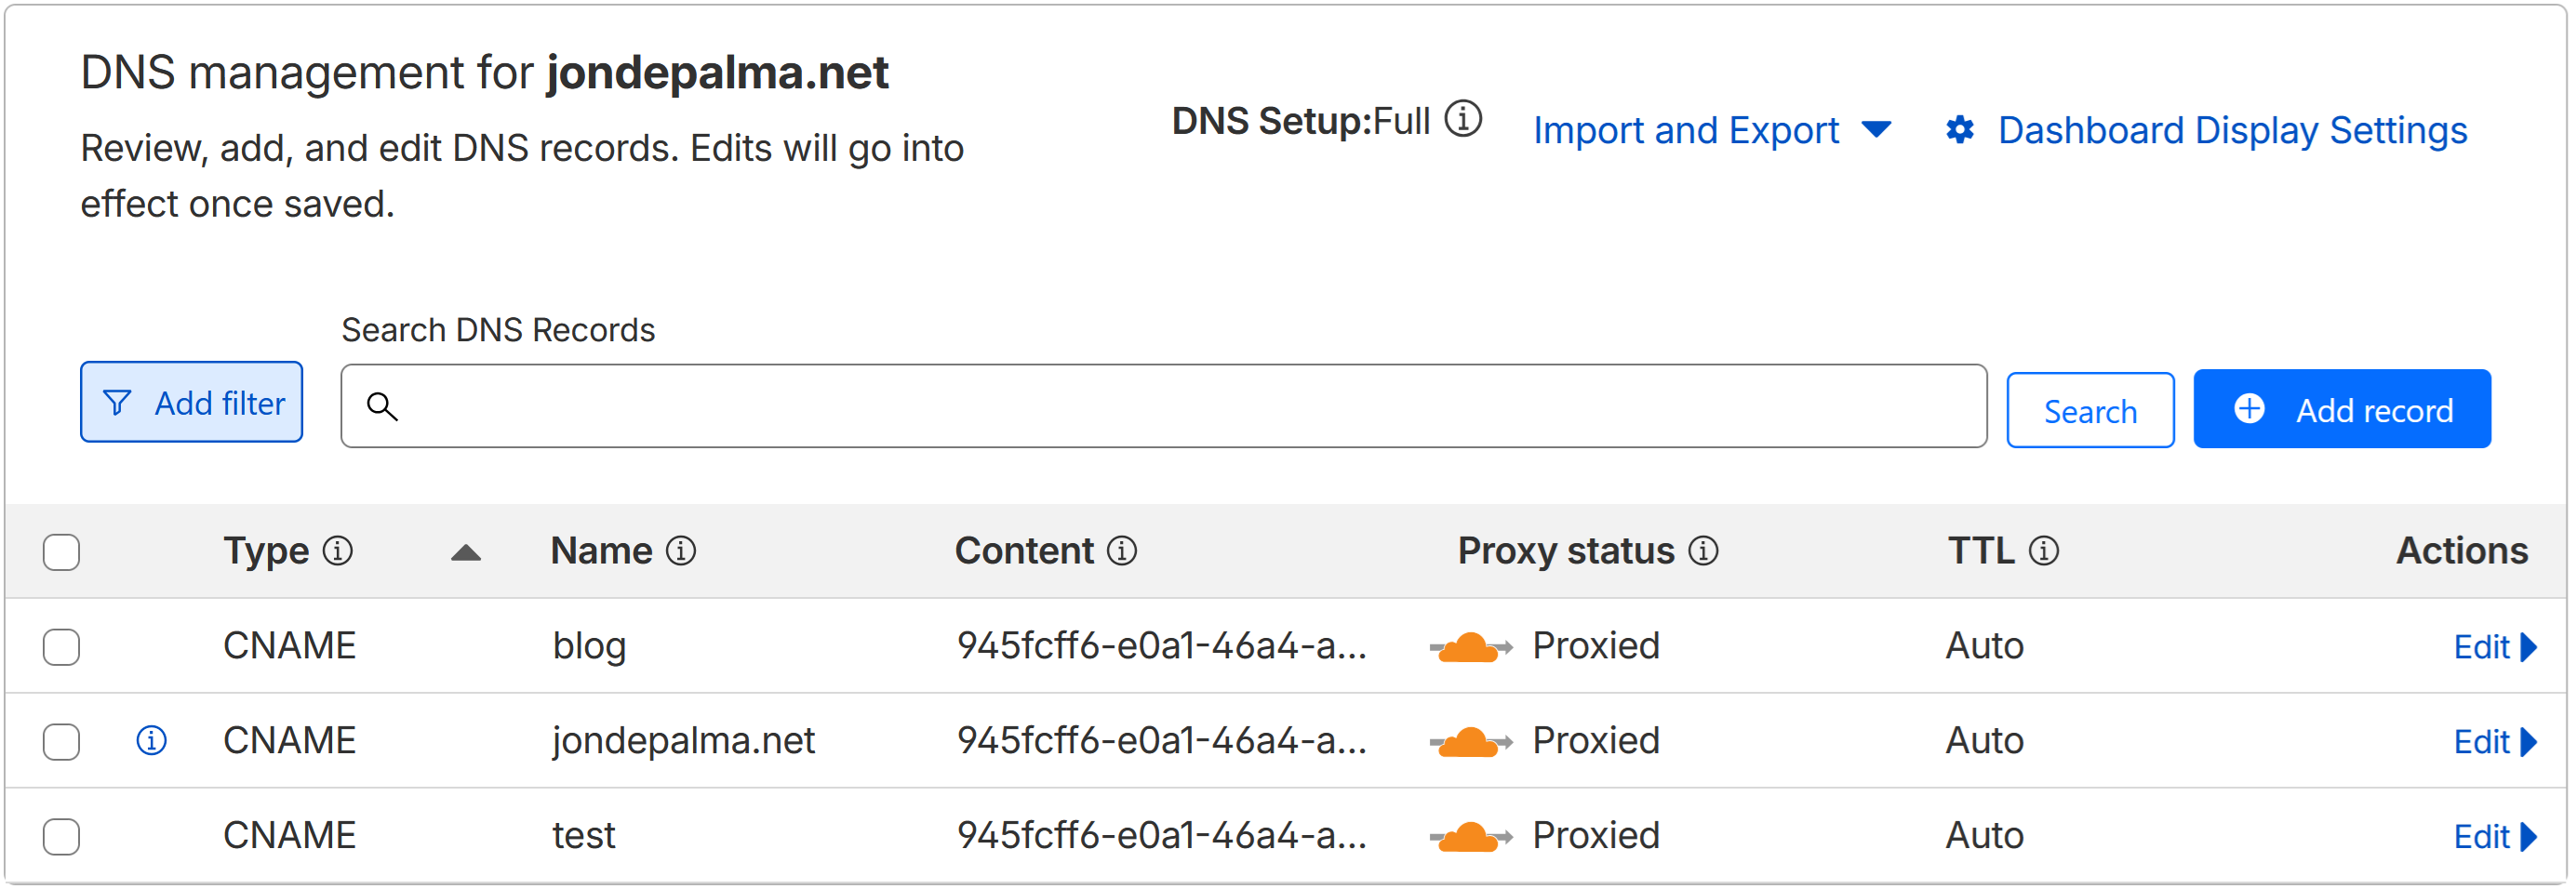
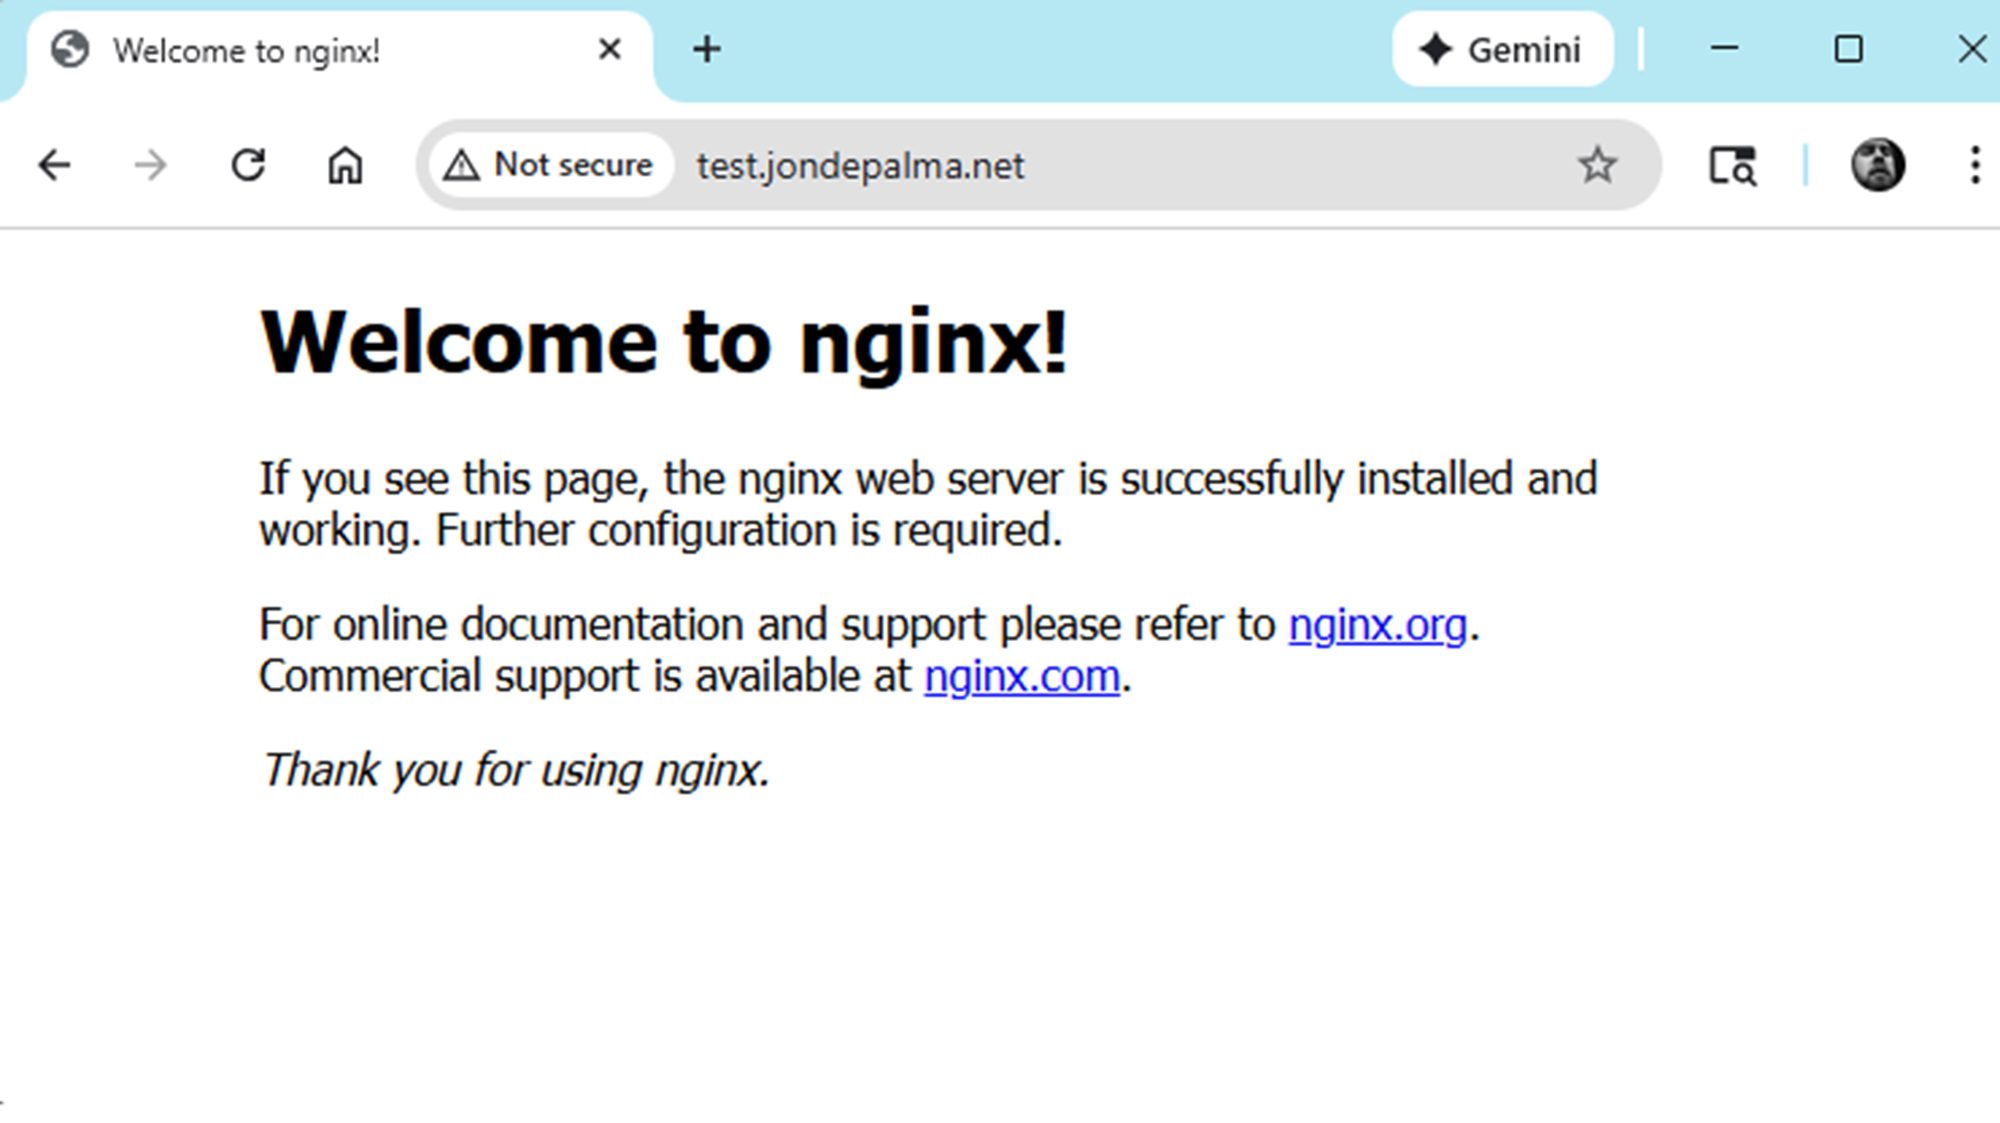
With my tunnels and ingress/egress management in place, it was time for a quick test! Before I went too far implementing additional services I wanted to ensure the foundation and concept actually worked. In Claude's implementation plan there were steps to deploy a simple nginx service which would appear in a sub-domain on my backup site: test.jondepalma.net
This is also a great example of the basics for future K3s deployment manifests in my cluster:
- Name the app and define the type (Deployment, Service, etc.)
- Indicate the number of replicas and any additional metadata (only 1 replica here, since non-prod).
- Specify the container to build the image from: In this case the latest
nginx:alpinecontainer. - Establishing a Service in the Deployment gives it a permanent service name and ClusterIP which enables Traefik to manage without having to grab new ephemeral POD names/IP's if something restarts.
- Define the ingress rules for Traefik to take requests on port 80 (web traffic) over the domain (test.jondepalma.net) and it will route it to the internal service that is running (test-nginx on a dedicated ClusterIP)
kubectl create namespace test

kubectl apply -f - <<EOF
apiVersion: apps/v1
kind: Deployment
metadata:
  name: test-nginx
  namespace: test
spec:
  replicas: 1
  selector:
    matchLabels:
      app: test-nginx
  template:
    metadata:
      labels:
        app: test-nginx
    spec:
      containers:
      - name: nginx
        image: nginx:alpine
        ports:
        - containerPort: 80
---
apiVersion: v1
kind: Service
metadata:
  name: test-nginx
  namespace: test
spec:
  selector:
    app: test-nginx
  ports:
  - port: 80
    targetPort: 80
---
apiVersion: networking.k8s.io/v1
kind: Ingress
metadata:
  name: test-nginx
  namespace: test
  annotations:
    traefik.ingress.kubernetes.io/router.entrypoints: web
spec:
  rules:
  - host: test.jondepalma.net  # Change to your actual domain
    http:
      paths:
      - path: /
        pathType: Prefix
        backend:
          service:
            name: test-nginx
            port:
              number: 80
EOF
Add the test subdomain in Cloudflare and provide the Traefik service so it can watch for traffic:
Cloudflare Zero Trust → Tunnels → Your tunnel → Public Hostname
Add:
Subdomain: test
URL: traefik.traefik.svc.cluster.local:80
No TLS Verify: ON
Succesful deployment! As of this writing, the basic nginx-test has been running without failure for 14 days.
Infrastructure as Code - Gitea Diversion
After working through the Cloudflare and Tailscale deployment, and seeing the importance of managing the K3s manifests from something as simple as the nginx test, I wanted to establish strong source control practices. After seeing the iterative changes to set up Kubernetes Secrets, and tweak the manifests to solve deployment issues, I asked Claude for a recommendation on how to set up and manage an Infrastructure repository.
Infrastructure as Code Benefits
Organizing manifests in a Git repository structure:
~/pi-cluster-infrastructure/
├── networking/
│   ├── cloudflare/
│   │   └── cloudflared-deployment.yaml
│   ├── metallb/
│   └── traefik/
├── storage/
├── monitoring/
└── applications/
Benefits realized:
- Version control for all cluster configuration
- Easy rollback to previous versions
- Documentation through commit messages
- Shareable with team or community
- Disaster recovery:
git clone+kubectl apply
Takeaway: Start minimal, add complexity only when needed.
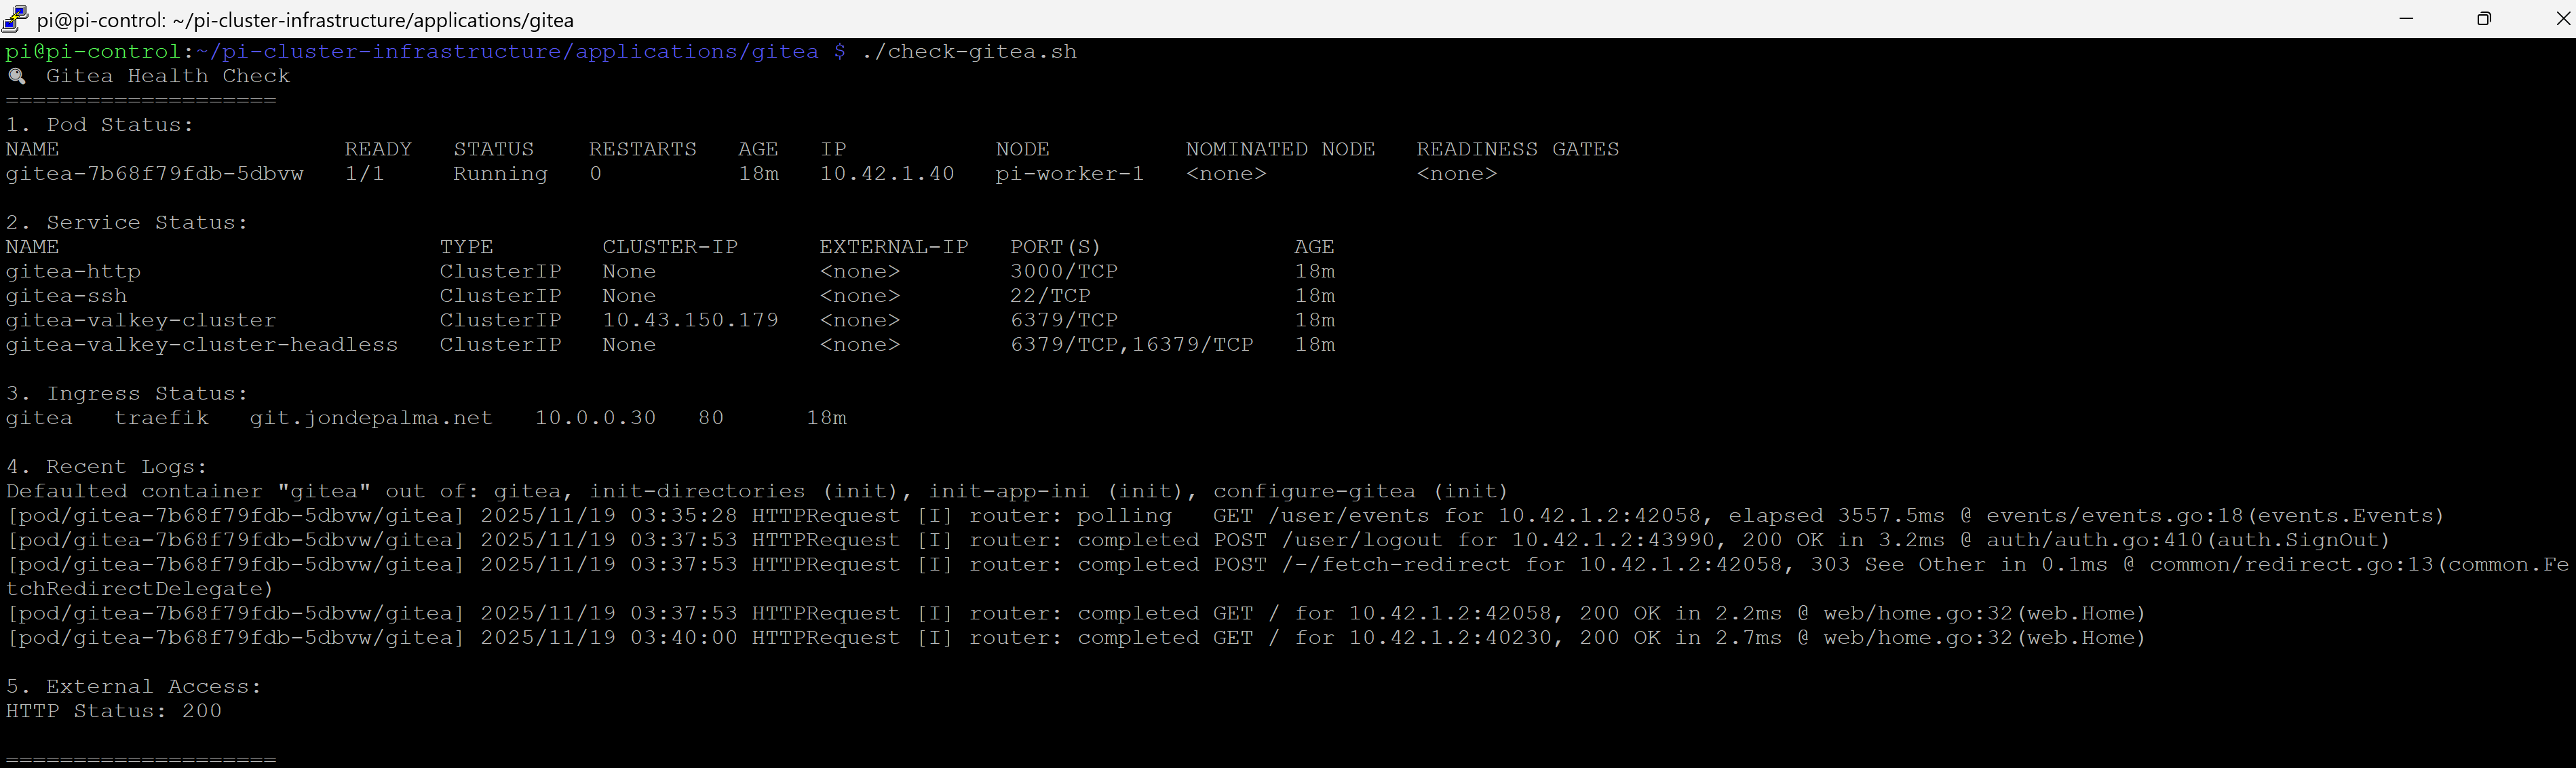
In the spirit of this project, I wanted to self-host something on the cluster which re-inforced a recommendation from the original cluster implementation plan: Deploy Gitea with Postgre as my own git repository and container registry. This will be my source control solution for new applications that I build and being able to package and deploy new services in my cluster.
I was already planning to deploy Postgre for application projects, so we enabled Gitea to use the external Postgre server. This led to some more fun troubleshooting to initialize the database authentication secrets and manually apply them since the services were loading at the same time, and environment variables were not available create databases and users.
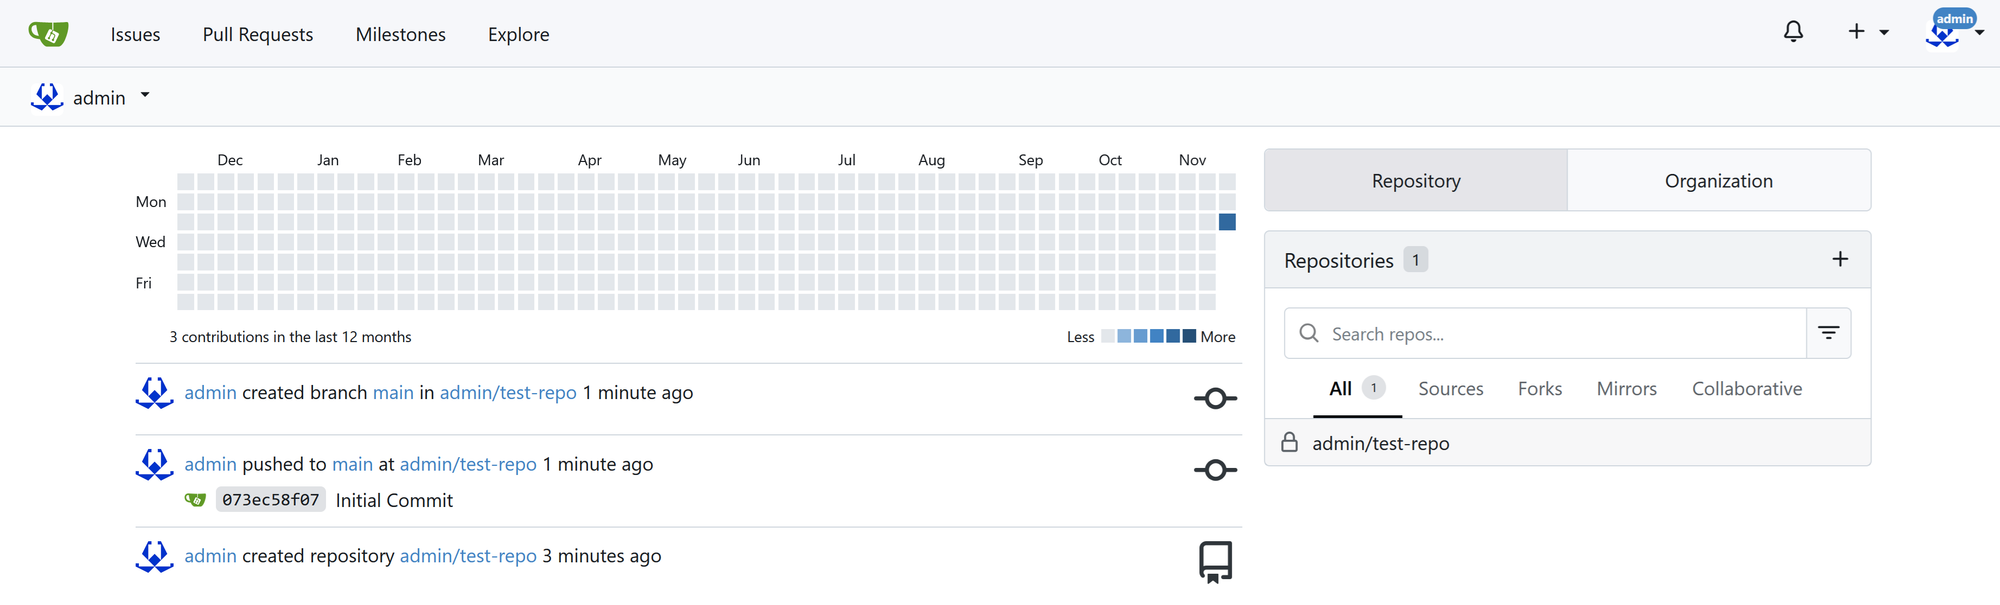
The full Gitea Deployment Guide is up on my Gitea repo: Now mirrored on GitHub!
After working through Claude's guide, my Gitea service was up and running and accessible over the Cloudflare Tunnel.

Conclusion and Next Steps
The concept has become reality. I am hosting real services from a three-node Raspberry Pi cluster. I have traffic flowing through Cloudflare and routed to K3s services without needing to set up port-forwarding or complex router configurations. I am self-hosting my repository (mirroring to GitHub for backups--my project is still proof-of-concept in practice). Finally, I'm set up to be able to manage and deploy my infrastructure using the best of what K3s brings: Declarative manifests, secure secrets management, and built-in monitoring and management.
While I deviated from Part 2's goal to have Ghost deployed, I'm in a strong position to finish the remaining activities in Part 3 and Part 4.
More to come soon!
Next Up:
- The Spark: Imagining a Raspberry Pi 5 Cluster
- Part 1: Core Cluster Hardware Build and Initial Install
- Part 2: Services, Services, Everywhere!
- Part 3: The Final Layer - Hosting Ghost & The Great Migration
GitHub Resources
Cloudflare Kubernetes Approach