Part 1: Core Cluster Hardware Build and Initial Install
First was to refine Claude’s over-engineered solution into something focused and manageable. I need space to develop apps, I want to self-host some sites and blogs, and I want to be able to publish projects. Ultimately, Claude arrived at a more straightforward and simplified approach.


Table of Contents
Part 1 - Cluster Build
As I mentioned in this series’ first post—this started as an abstract idea and I’ve been working with AI to refine and get to a point where I am physically implementing this home lab project.
Spoiler alert—the core cluster is live! No public services yet, but K3s is running and my foundational configuration is set.
If you prefer to jump straight to the build steps, go here. However, I think the way AI has impacted this project is the real story.
One of the first challenges was to refine Claude’s over-engineered solution into something focused and manageable. I need space to develop apps, I want to self-host some sites and blogs, and I want to be able to publish projects. Ultimately, Claude arrived at the following recommendation.
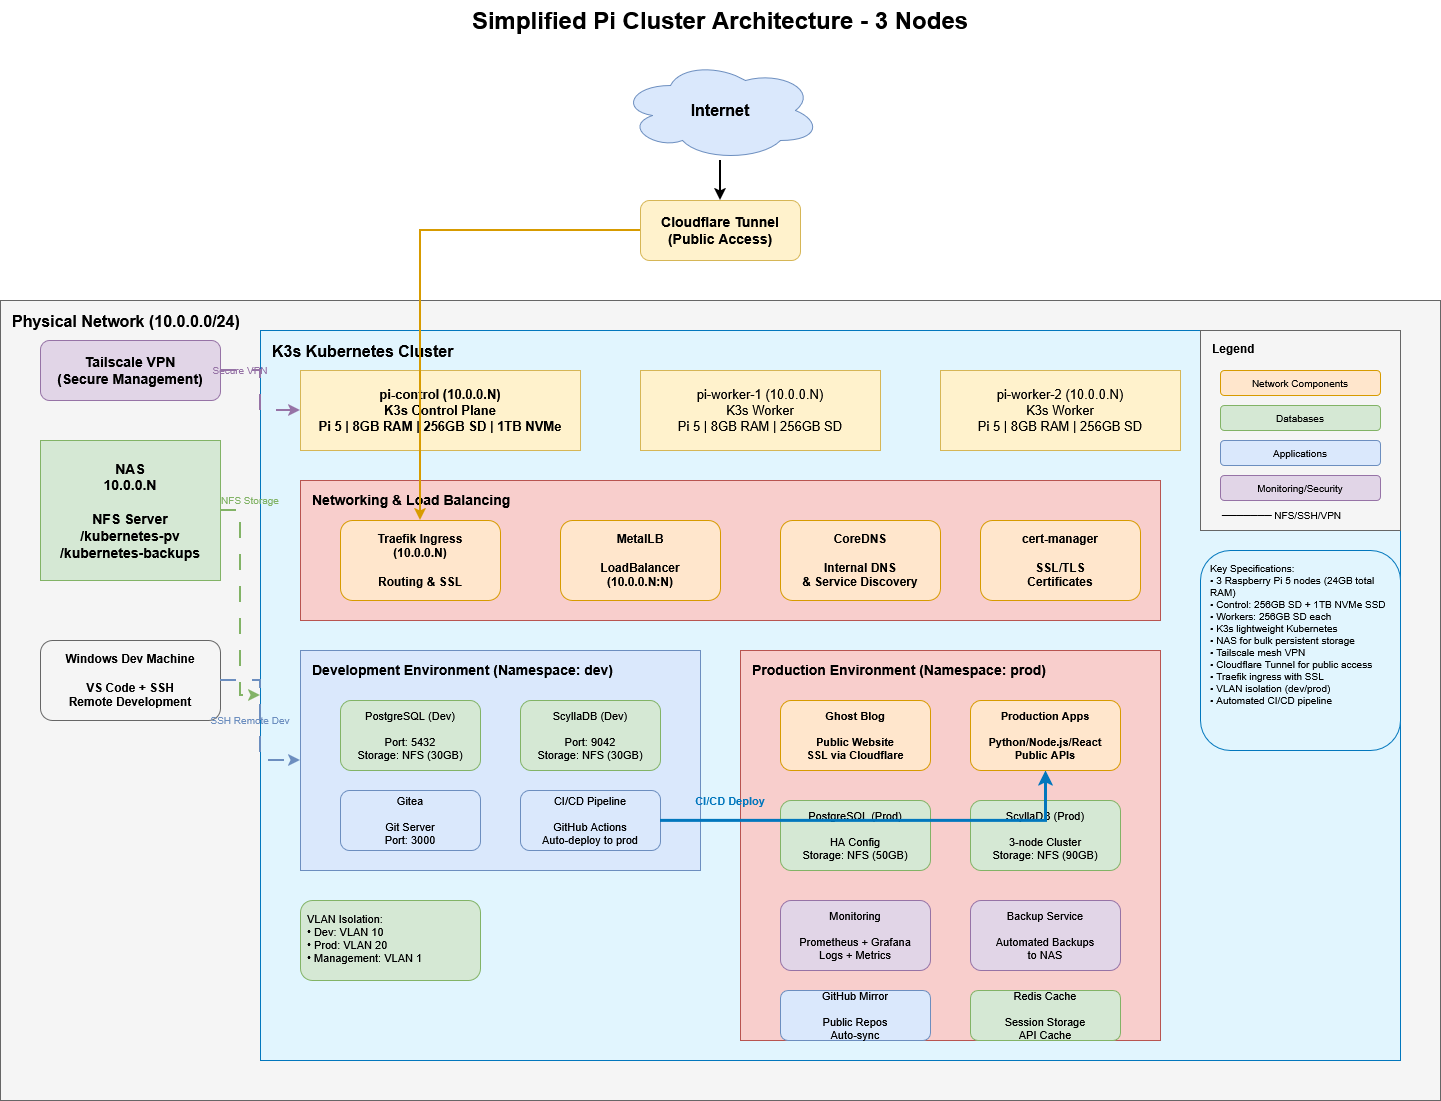
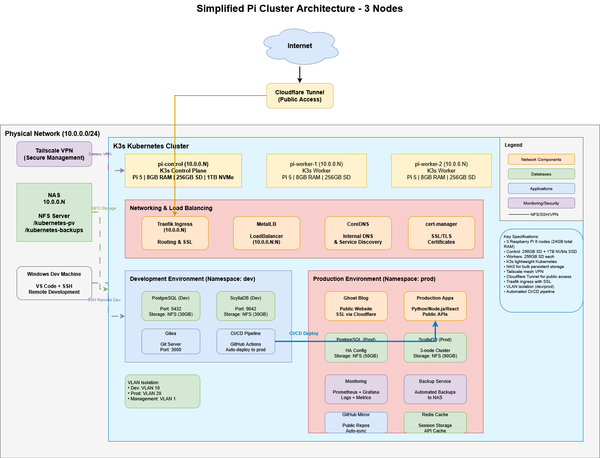
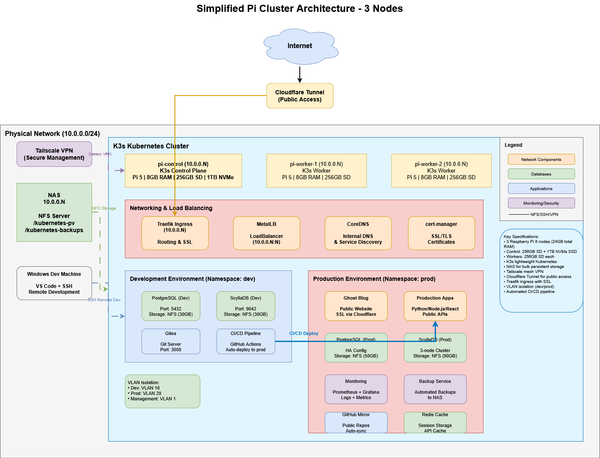
The implementation plan Claude created is comprehensive, and included recommendations for hardware to build a small, medium, or large Raspberry Pi cluster. I already had a NAS and decide to find a middle ground between small and medium. I settled on three Raspberry PI 5 8GB, giving me a control plane and two worker nodes. For the control plane, I wanted to beef it up so I added a 1TB NVMe SSD. Each Raspberry PI has a 256GB microSD for OS and local storage.
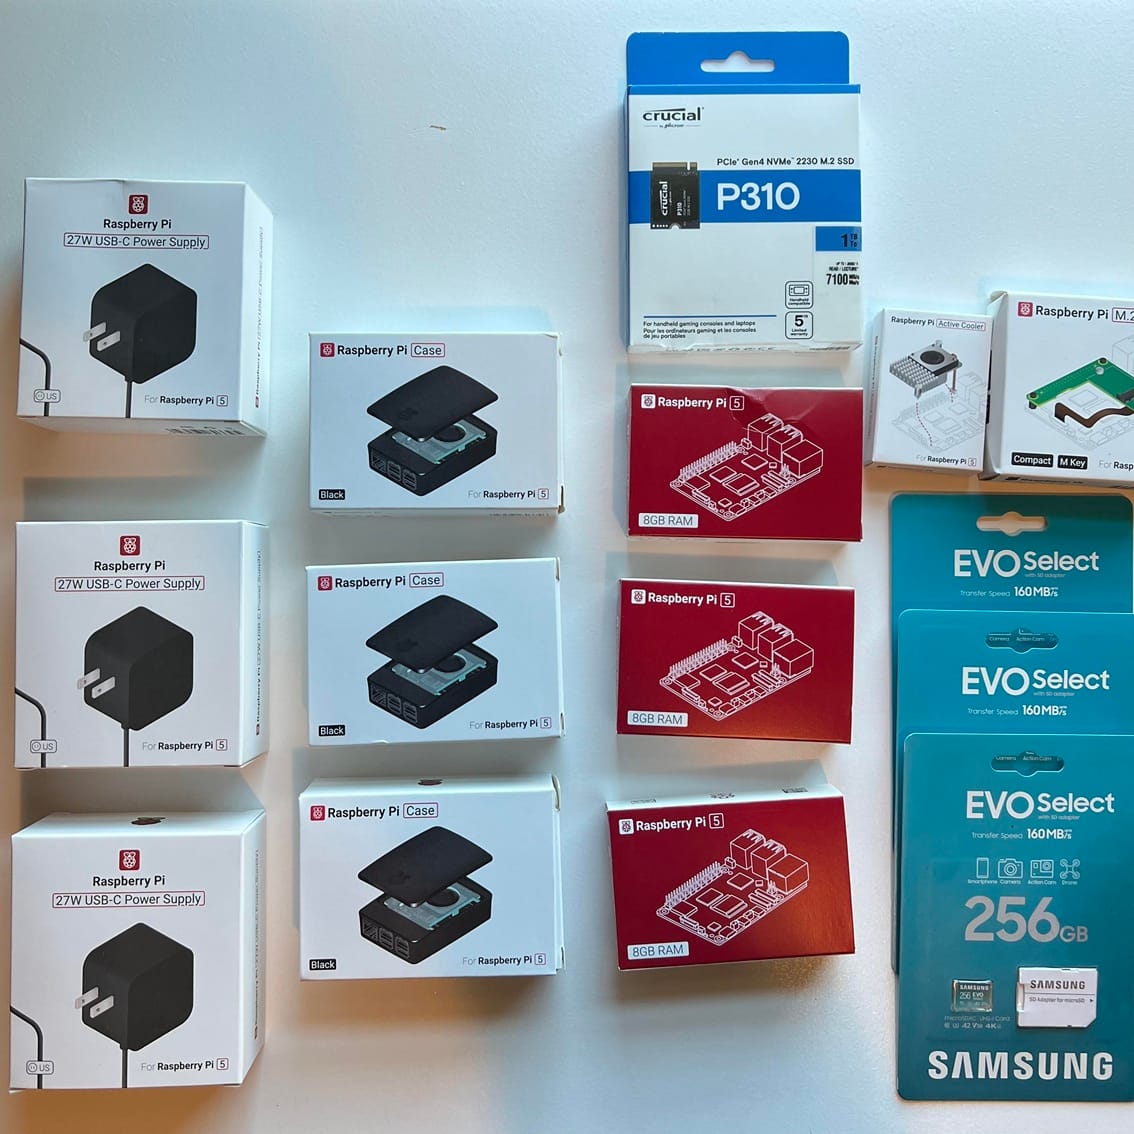
One area where Claude struggled was the “shopping list” it provided. Several of the links were dead or to old versions of products. I ended up just using the concepts but searching for the components myself. As I gave Claude a prompt with the actual hardware I purchased, Claude refined the implementation plan to include steps to setup and mount the NVMe drive, connect to NAS, and set up the local-path storage classes.
Claude’s implementation plan and Quick Start Guide were the foundations for the following steps. Part of my goal with this project is to demonstrate effective use of AI, and I had several observations after working through the Phase 1 activities.
Lessons Learned
The plan was perfectly straight forward, just like reading a technical forum or product setup guide. However, at times I felt the “why” behind some actions was missing. For example — The install command for the K3s control-plane included some attributes I would have wanted to have context about (i.e. “node-taint” on the control-plan to define whether it would be available to schedule worker tasks). This is an easy thing to refine in the prompt used when directing Claude to create the plan.
- What amused me about the “node-taint” setting was that Gemini actually alerted me to it. I’ve been using Gemini to help content plan and identify key points for the blog. This setting was in its content plan as it called out I should explain the flags. In Claude’s plan, you may skim over, but it is actually critical to the control-plus-worker cluster concept. Claude has the setting correct, Gemini gave weight to its importance.
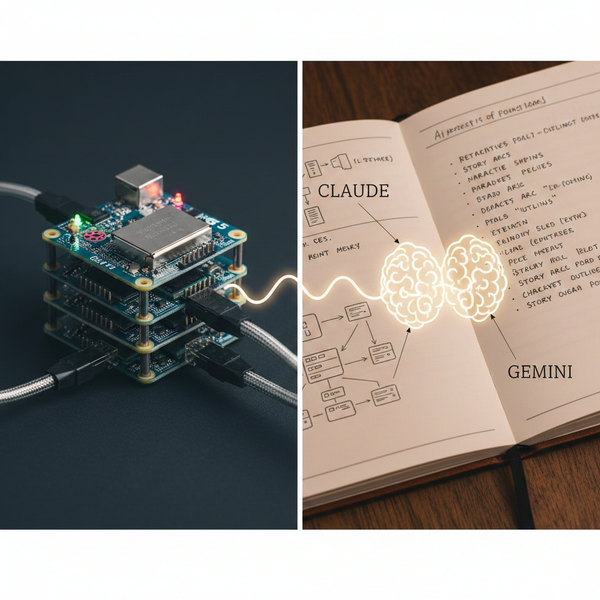
- This highlights the importance of “role” in your work with AI. Claude is focused on getting the cluster up and running. I didn’t ask it to explain all its decisions! Gemini is focused on making sense of the implementation plan for you, the reader. It is elaborating on the key configurations that make the system work.
Like any implementation there were some things that threw errors, were out of sync, or were missing. For example — When installing the K3s on each of the devices, there was a memory group that was missing.
- Feeding Claude the error, with the context it had about the implementation plan, made troubleshooting and resolving a breeze. I could see the sites, GitHub charts, and product documentation it was citing to feel confident in its solution. In many cases it gave options and why.
- This has always been a frustration or even blocker when trying these home lab projects or learning something for the first time—hours of looking through forums, piecing together a solution, and then eventually finding a more simple and elegant solution. Claude made that feel effortless: As if you had a context-aware specialist at your disposal.
I also found several examples where I was unsure of a recommendation in the plan and questioned it, which led to Claude correcting or revising the plan. For example — The MetalLB load balancer that was in the original plan was set to install directly from a versioned GitHub path.
- I asked Claude if there was a more recent version, and I could watch as it traced through the GitHub Charts, compared features that would be used in my implementation, and concluded that yes, we should use the newer version. A great example where human-in-the-loop should still question and understand what AI has generated.
Hardware setup
The major hurdle I faced with setting up the hardware was the control-plane. In order to use the NVMe SSD drive, I needed to install a Raspberry Pi HAT. I had also chosen an active-cooling solution for this node since I expect it to be orchestrating more than the other nodes, which have a basic heat-sink and fan. With all these components, the standoffs were not tall enough and the GPIO connection could not reach. I had to purchase a 16MM GPIO header, and some 15MM nylon standoffs. This one was on me for not reading the details on the active-cooling component which states that you’d need those additional items.
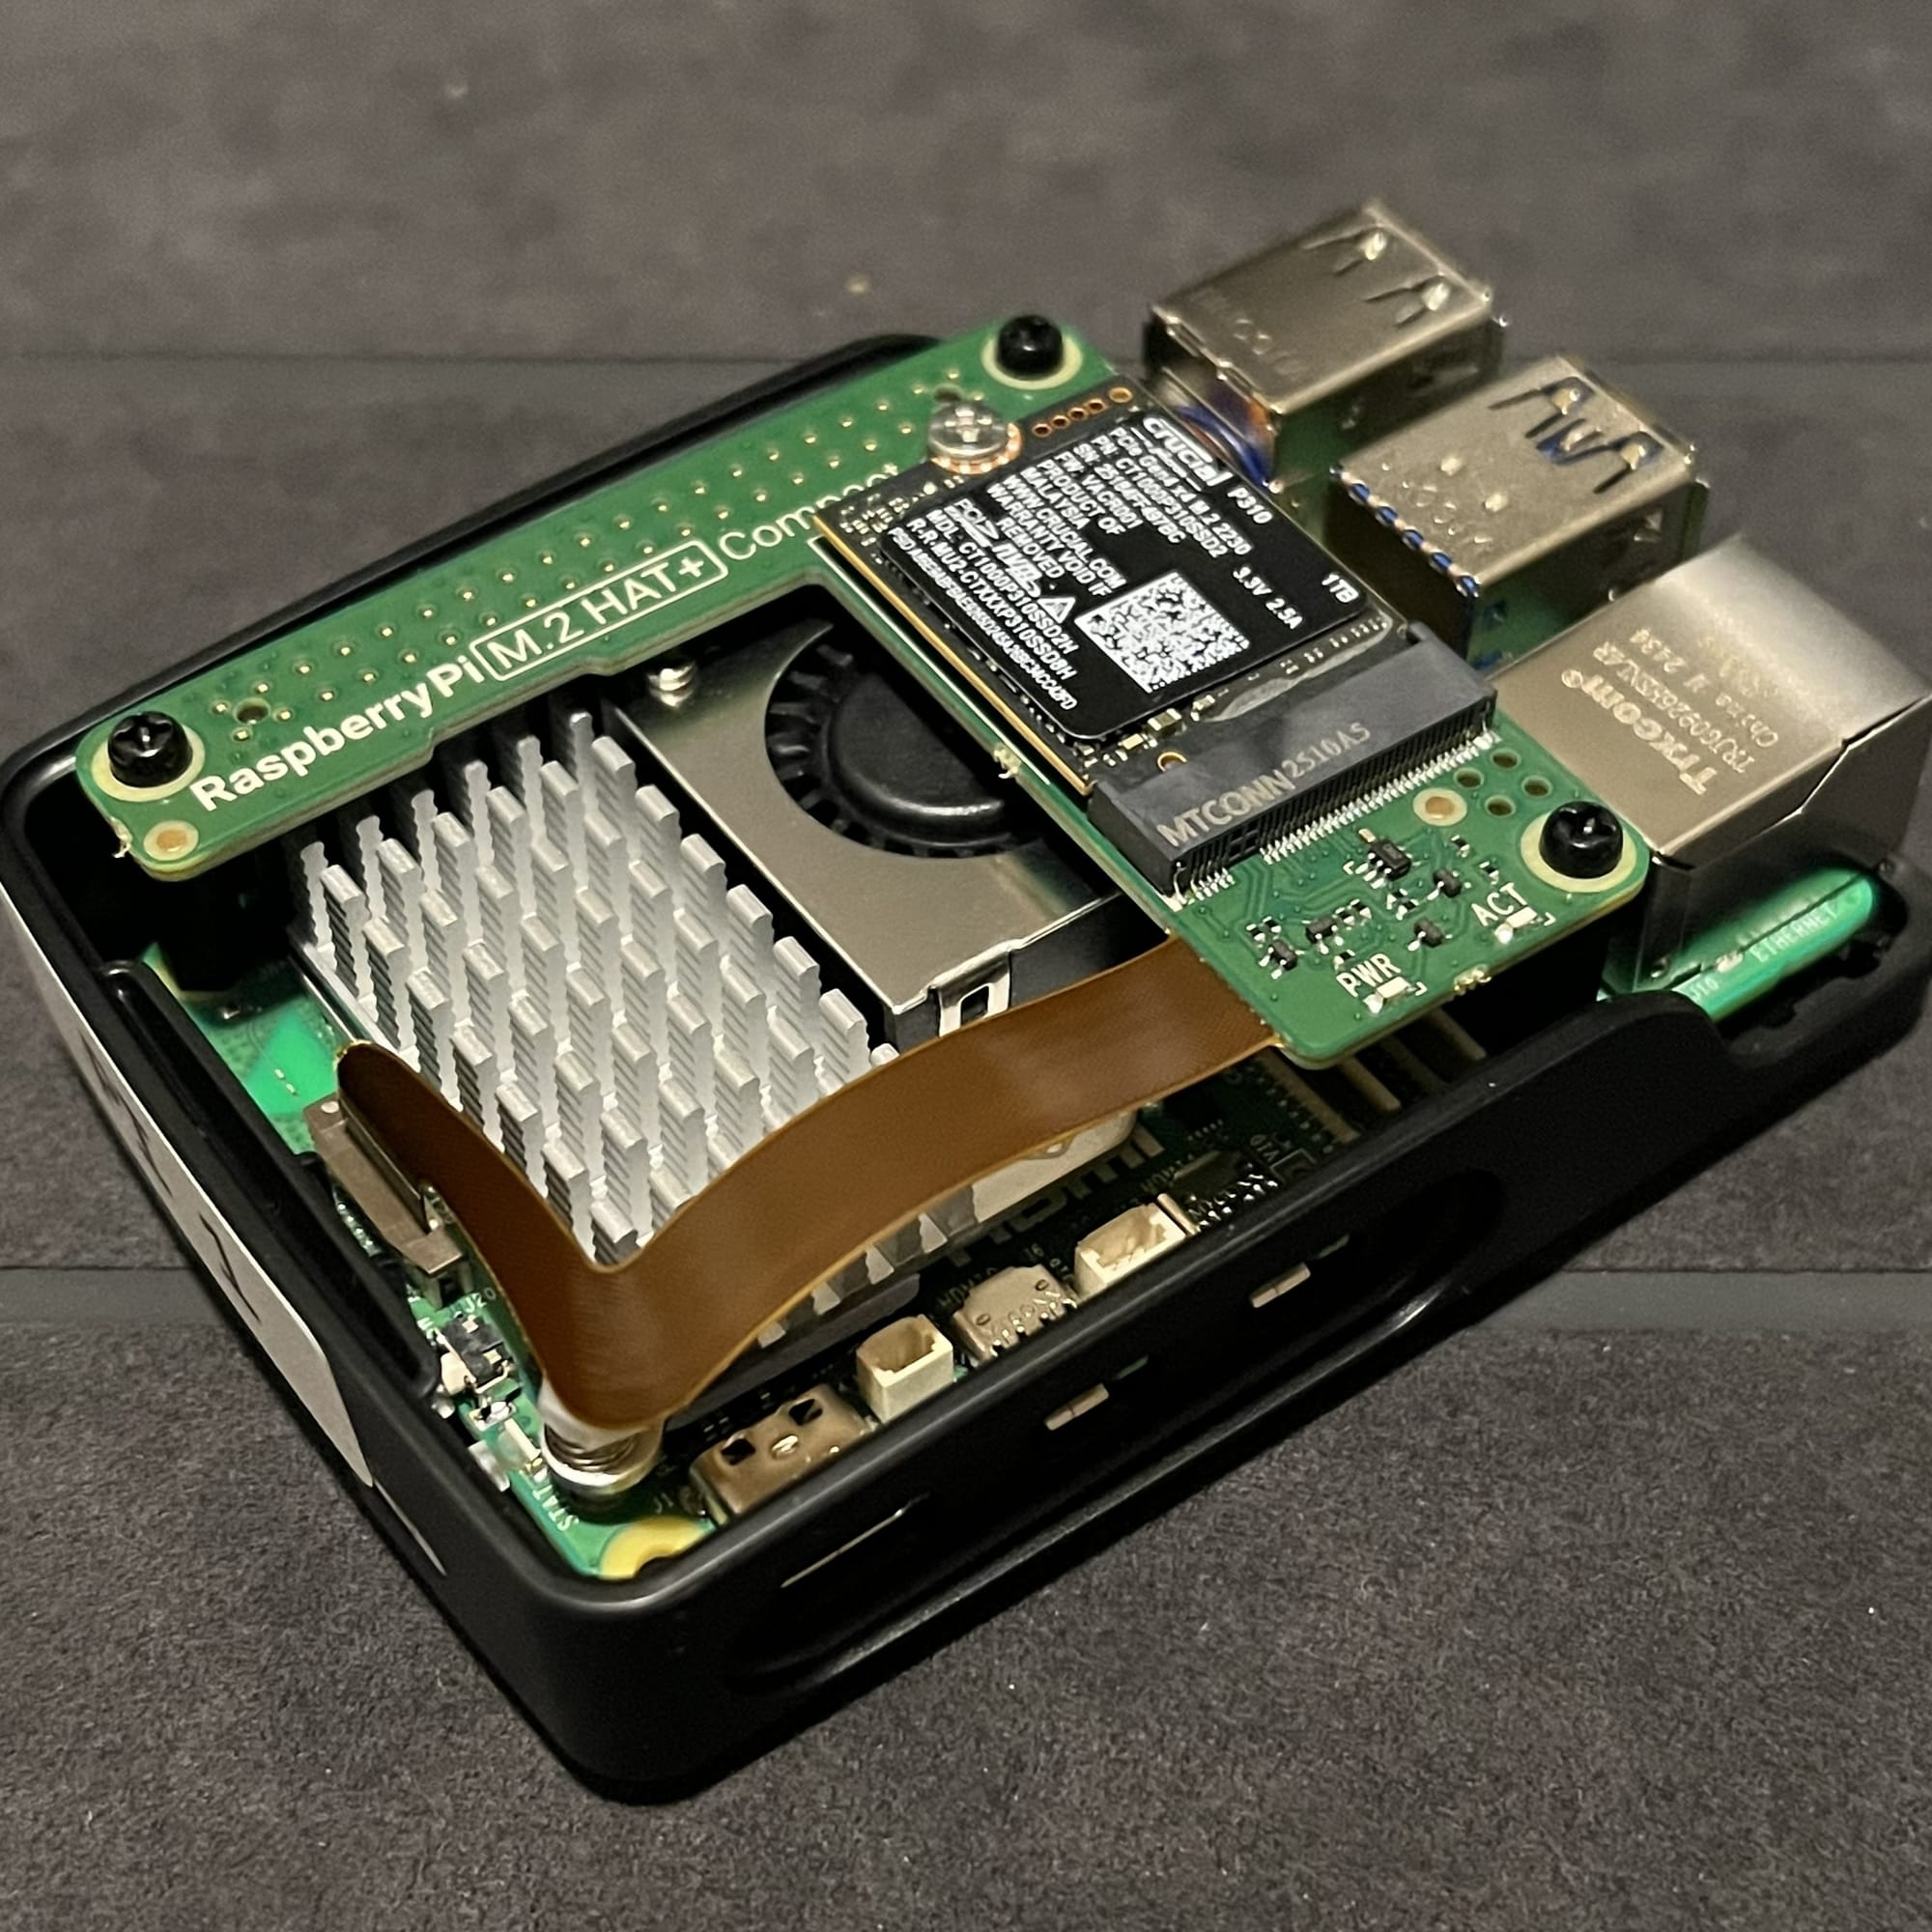
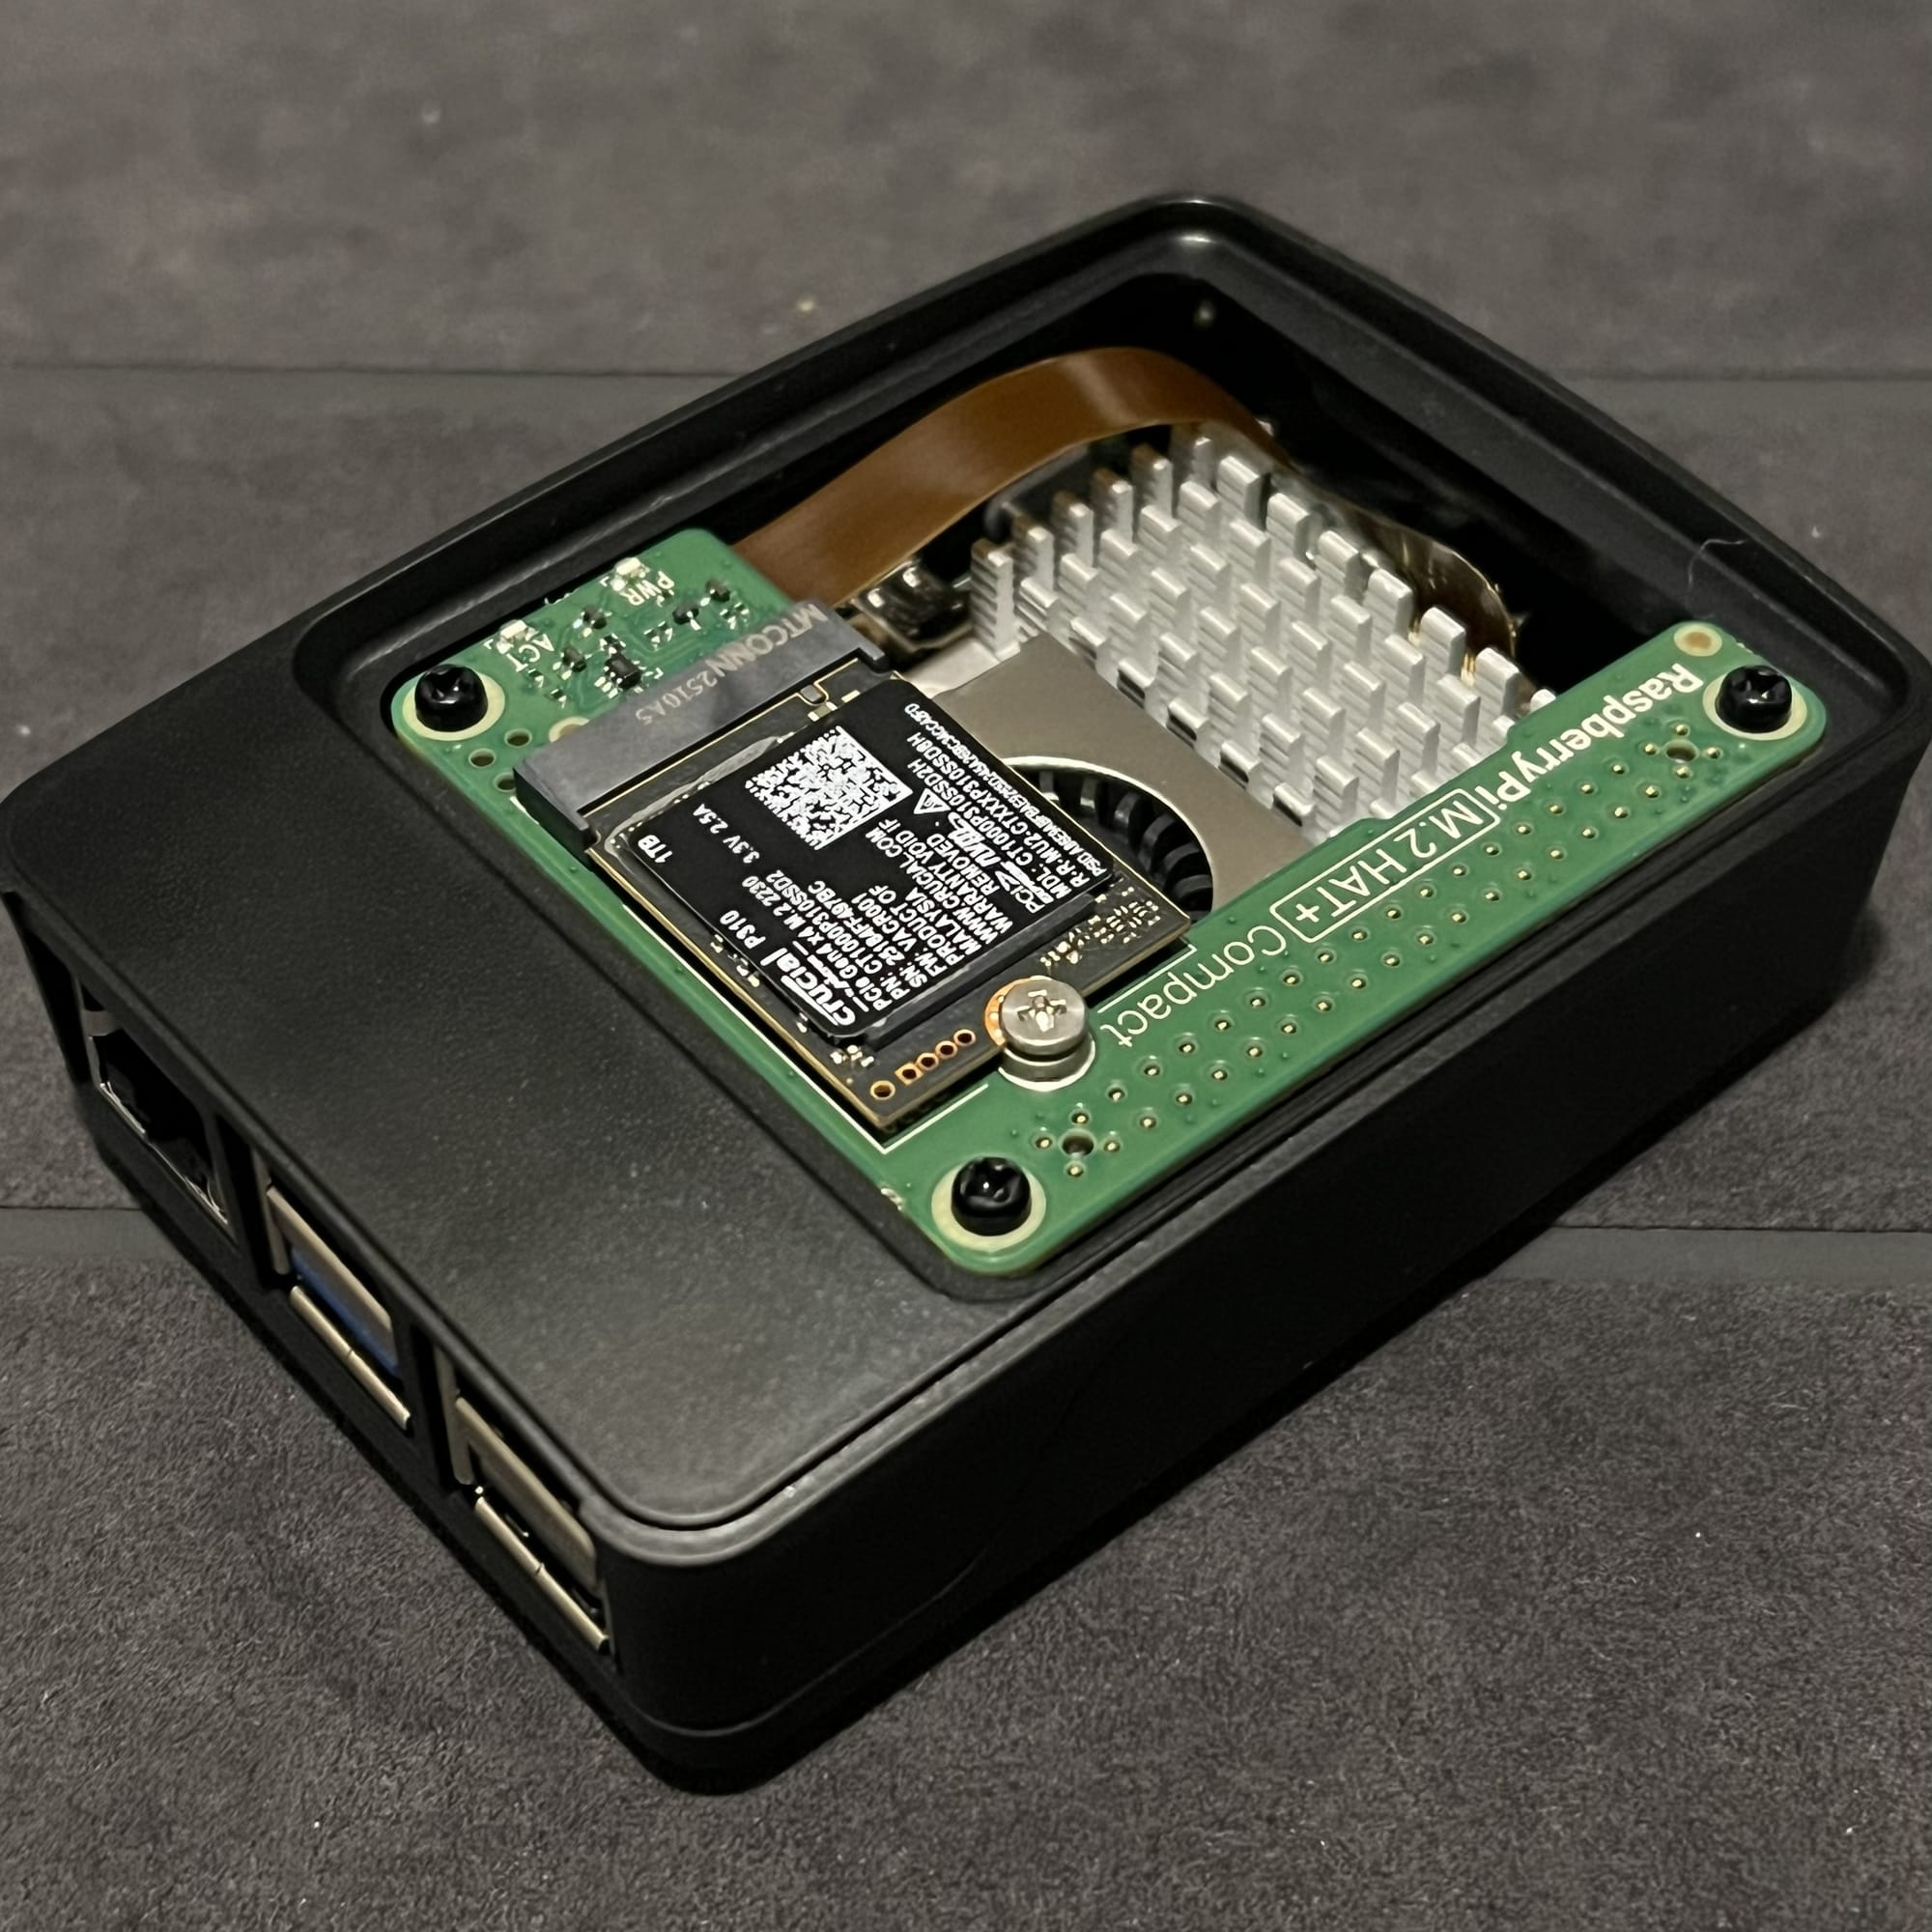
Everything fit neatly in the case, once I had the appropriate GPIO Header and Standoffs
Installing Raspberry PI OS
Claude’s implementation plan called for flashing the microSD cards with Raspberry PI OS Lite (64-bit). This version is minimal and headless, perfect for the cluster solution and to connect via SSH terminal. The Raspberry Pi imaging software was straightforward and easy to configure. The implementation plan gave the custom OS settings to fill in (hostname’s, SSH enabled, etc.)
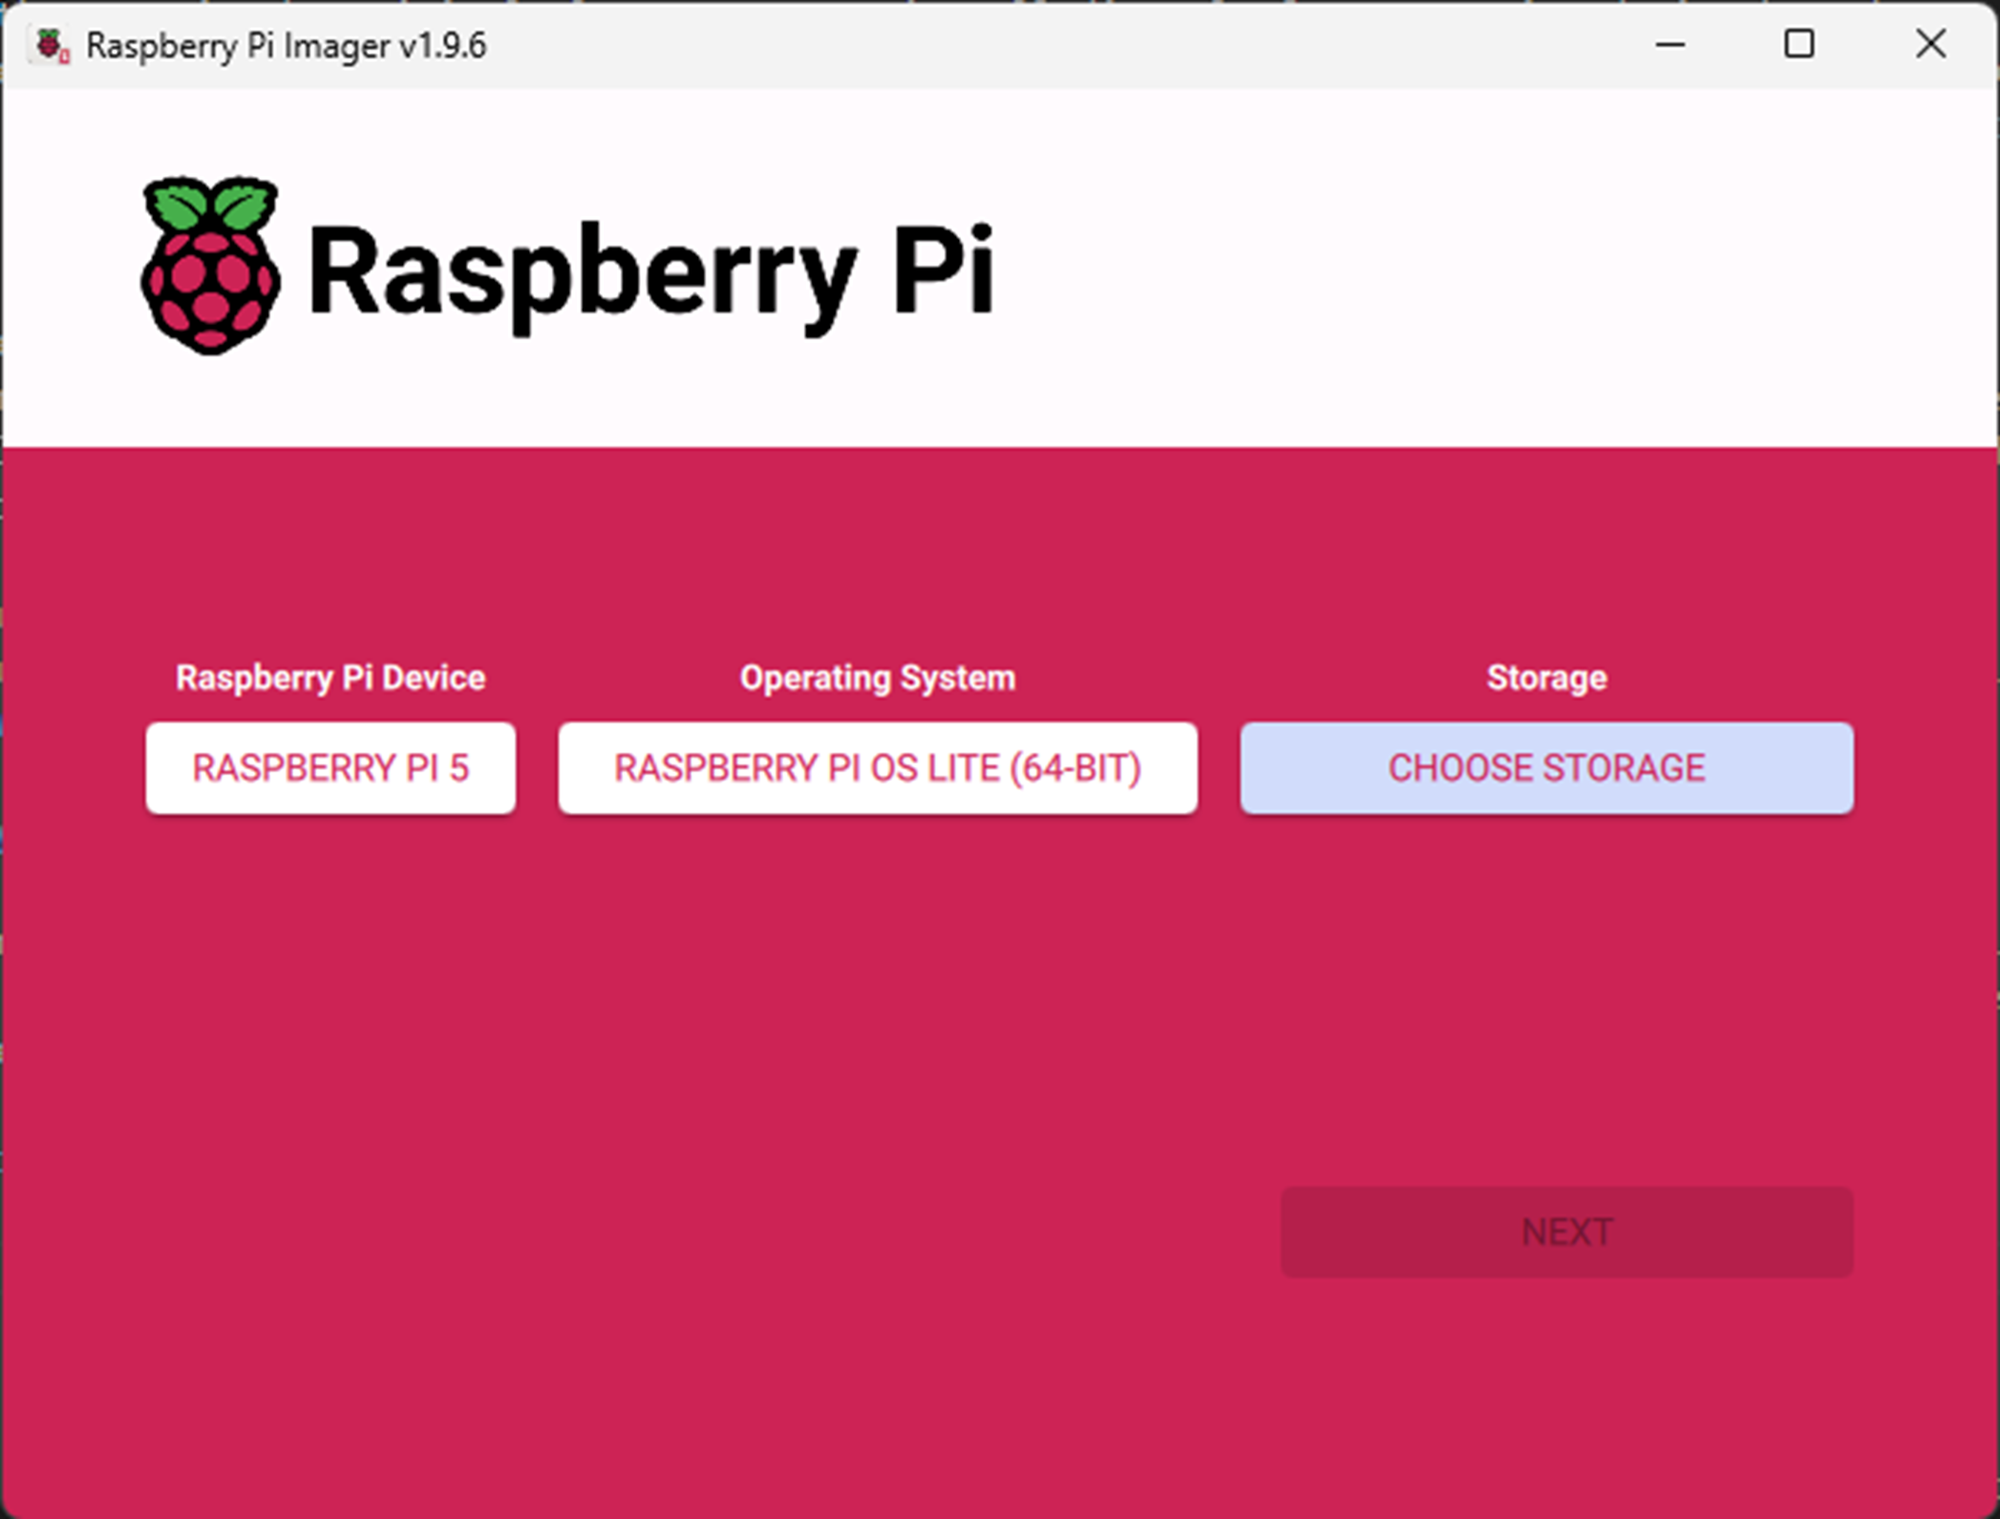
On your Windows machine:
- Download Raspberry Pi Imager
- Flash all 3 SD cards with:
- OS: Raspberry Pi OS Lite (64-bit)
- Settings (gear icon):
- Enable SSH (password authentication)
- Set username:
pi - Set password:
<your-password> - Configure WiFi (optional)
- Set hostname:
- Card 1:
pi-control - Card 2:
pi-worker-1 - Card 3:
pi-worker-2
- Card 1:
- Write to all cards
Additional OS Setup
Once the microSD cards were flashed, it was time to plug them in and boot up. It was easy to connect via SSH to the hostnames, and then run the commands in the implementation plan to provide static IP’s. This enables the K3s to have consistent node-to-node communication and—as my ecosystem gets more complex—my load balancers, Cloudflare tunnels, and Tailscale configs will be more stable and easy to manage.
On the control-plane, I ran the provided commands to format and mound the NVMe SSD. I chose the NVMe solution as I plan to have some database-driven applications. This provides fast, local storage.

Format and mount NVMe on pi-control first:
# On pi-control only
lsblk  # Should see nvme0n1 (1TB)

# Format NVMe
sudo mkfs.ext4 /dev/nvme0n1

# Create mount point
sudo mkdir -p /mnt/nvme

# Add to fstab for automatic mounting
echo '/dev/nvme0n1 /mnt/nvme ext4 defaults,noatime 0 2' | sudo tee -a /etc/fstab

# Mount it
sudo mount -a

# Verify
df -h | grep nvme
# Should show ~1TB mounted at /mnt/nvme

# Set permissions
sudo chown pi:pi /mnt/nvme
Nasty NAS
Getting the NAS mounted was slightly more difficult than I expected. My NAS has been running for years. I simply added a user that matched the same account on the Raspberry PI’s, enabled NFS according the Claude’s instructions, and went to mount. Failure!
This ultimately came down to a nuance in no root squash. The NAS operating system I have does not have a no root squash setting, it has a different naming convention. It was also mounting with NFS4, which requires more complex access set up. After several iterations of recommendations with Claude, the solution came down to using NFS3. Claude’s suggestion was this is more stable for K3s anyways, and once the command was updated to force NFS3, the mount was successful!
NOTE Dec. 1, 2025: Since this original post, I was able to resolve the NFS4 issues and correctly mount my NAS as originally planned.
K3s Setup
As mentioned in the lessons learned above, there were a few environment-level issues that came up during the install (missing memory group, an environment variable missing on each node, storage provisioner name mismatch, etc.) I’ve called these out in each step of the Phase 1 Implementation Plan and Quick Start guide resources in my GitHub Repo. These may or may not come into play in your environment, but where possible I included the test steps to verify things are working as expected.
The fundamentals of the setup is to have a single control-plane, and two agent nodes. Setting up the control-plane included the following flags:
--write-kubeconfig-mode 644: Allows non-root users to access it later.--disable traefik, --disable servicelb: We will use MetalLB and Traefik as separate installs, so we disable the default ones here.--node-taint CriticalAddonsOnly=true:NoExecute: Ensures no application pods run on the control node (keeps the brain focused on coordination).
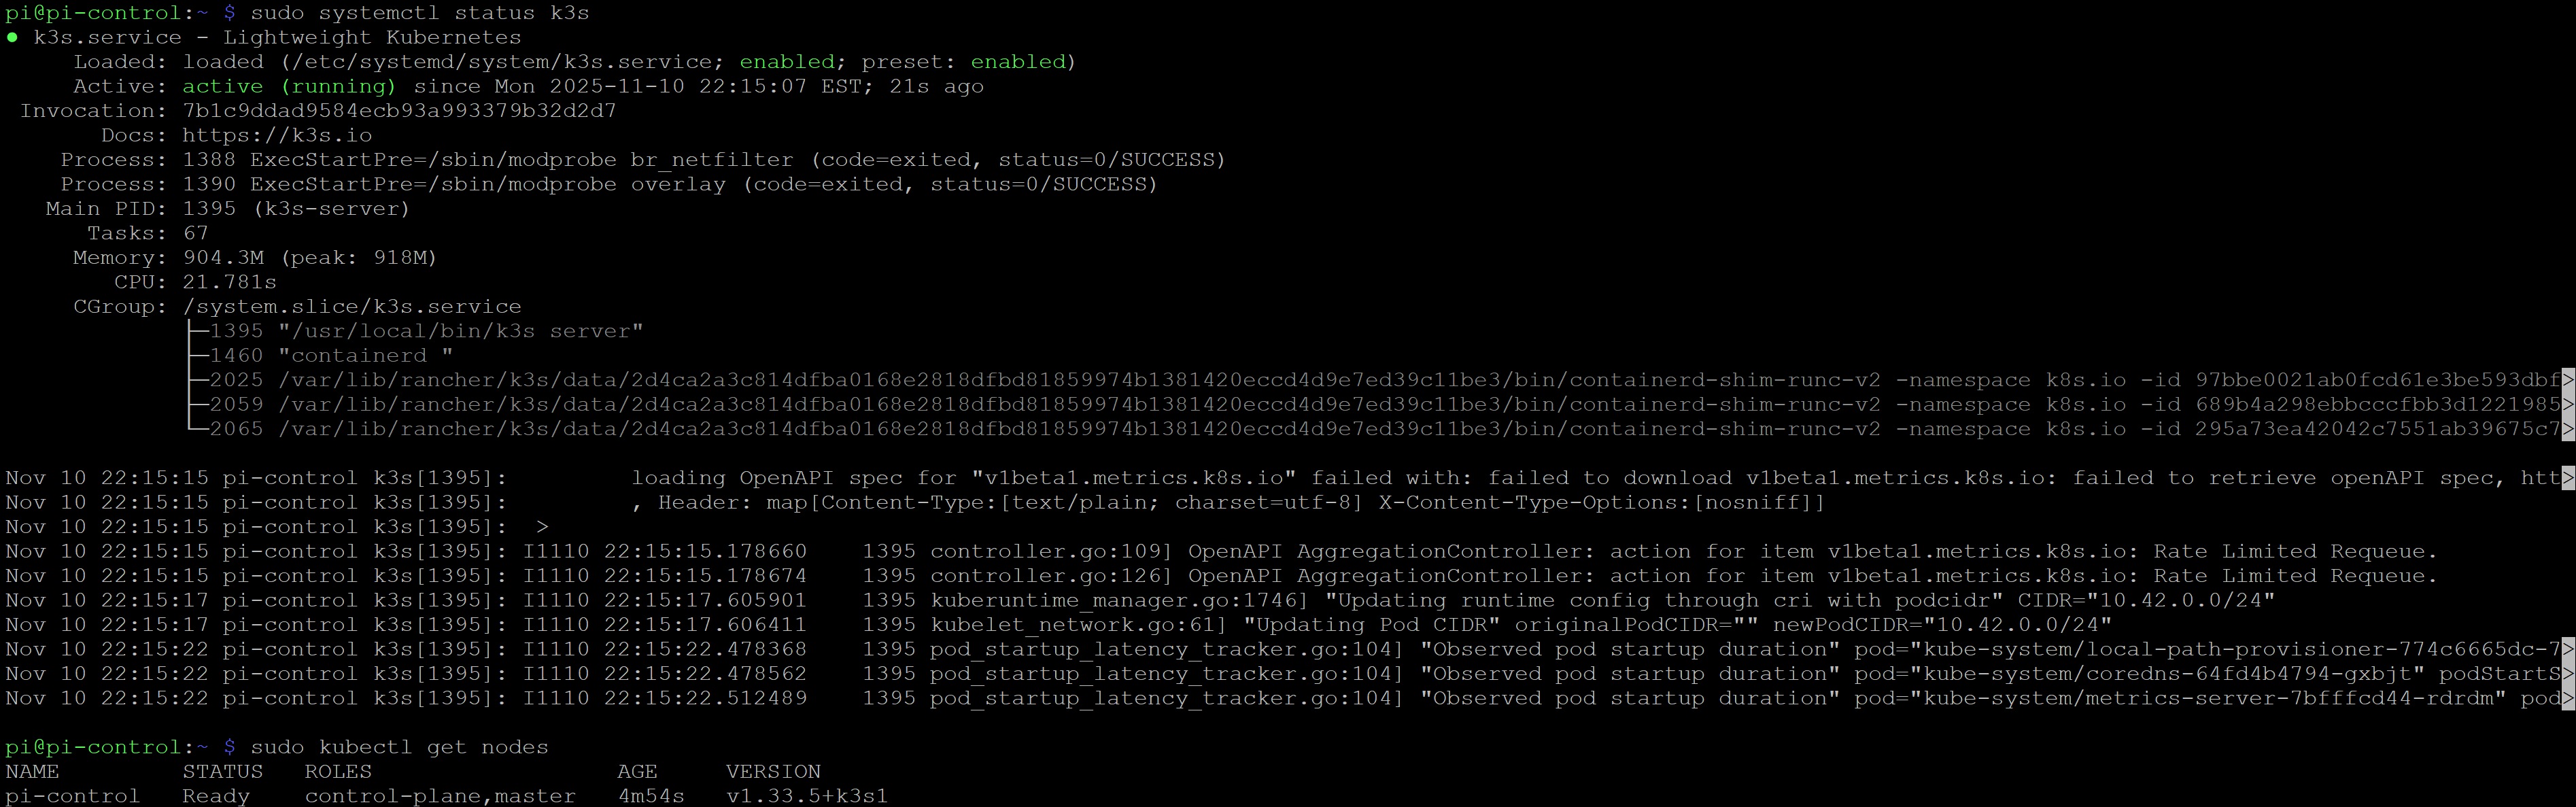
The agent nodes have a more straight forward install command, however you need to include the K3S_TOKEN from the control-plane so the agent nodes can connect.
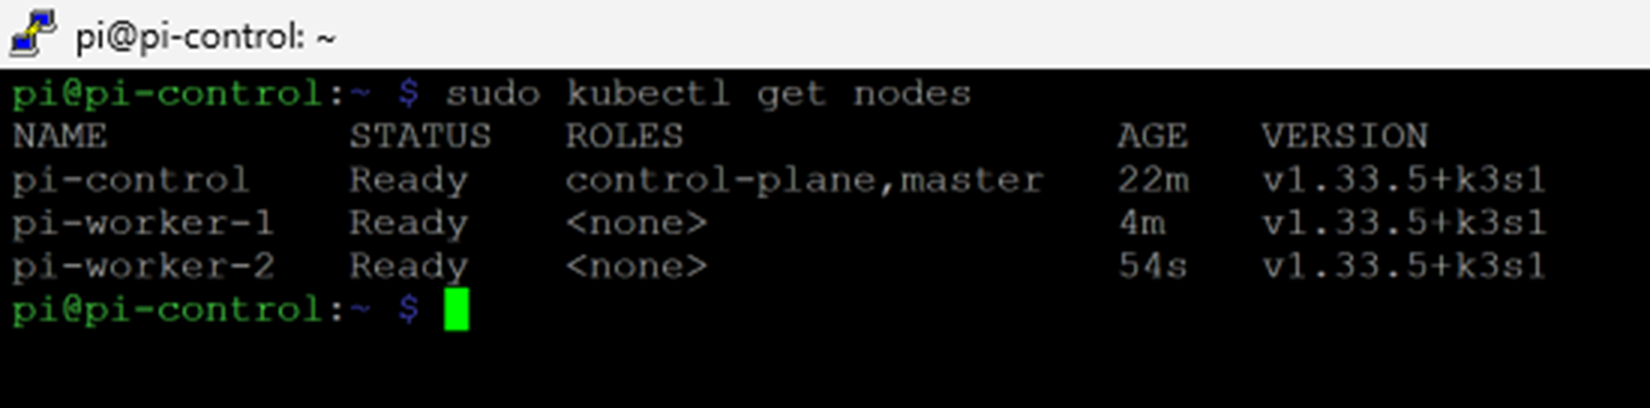
The sight of all three nodes reporting 'Ready' in the terminal was the first true software victory of the build. It confirmed the physical layer was connected, the OS was configured, and the core of my Kubernetes brain was finally alive.
Additional Networking
The first services to be set up in the cluster are the MetalLB load balancer and Traefik ingress controller. One of the primary services I’ll be running in my cluster is a blog (see Chicken and Egg for how you could be reading this blog when the cluster isn’t even live…)
Helm is used to help manage repos that are available for K3s to use. The bash kubectl apply command uses the manifests from the Helm repos to configure and spawn services. Service names and namespaces allow for stable endpoints, while actual worker pods can be ephemeral and start, end, move between nodes as real work is executed.
The load balancer will have a range of IP’s that can be given to the K3s services as they come up. The Traefik ingress controller will route requests in and out of the cluster through these IP’s.
The most straight forward example is the Ghost Blog that will exist. I do not want to have to set up complex port forwarding and manage IP’s for each instance of a service. K3s, MetalLB, and Traefik will do that all seamlessly: My website will have a Cloudflare tunnel that routes to a Load Balancer IP (on my LAN IP’s), Traefik will manage that ingress request and route to the Ghost Blog service and related pod (on the K3s cluster internal IP’s), and the content will be served back along the route.
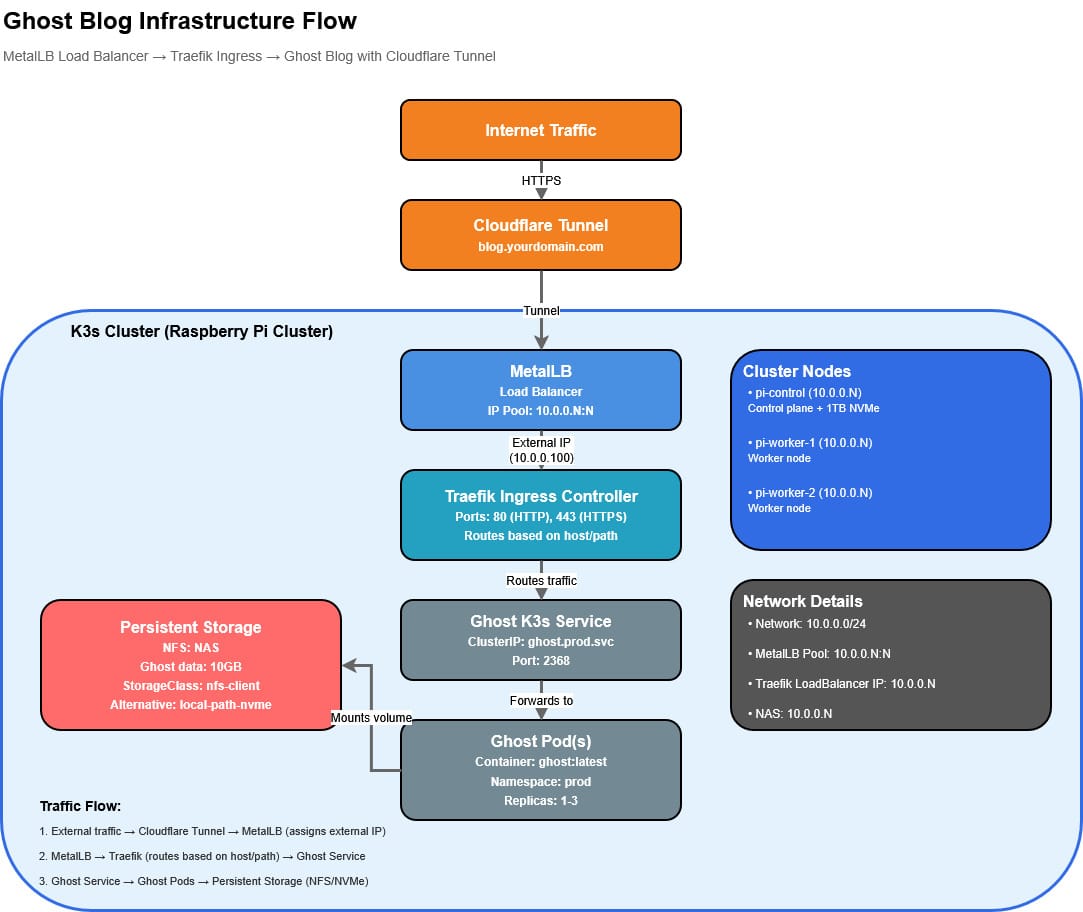
With these components configured, I can now have K3s use the Load Balancer and Ingress controller to manage traffic in and out of the cluster for me.
Storage Classes
I still feel I need to do a bit more testing and researching on this point. Some of the storage class commands later in the build reference NFS4.1. My concern is that the NAS provides persistent volume for the K3s pods, enabling seamless starting, ending, and movement of K3s pods across nodes. It will also be the backup solution to ensure snapshots, images, and database backups can be scheduled. If the NAS configuration becomes unstable, the whole thing will come down.
I end up with four core storage classes for my cluster. This is one of those critical components to ensure you test and verify the storage is working before deploying services. I had Claude create a comprehensive guide with details and test activities(see in below GitHub Repo).
With NVMe, NFS on NAS, and local SSD storage configured, the storage strategy for my cluster was set.
Hardware Overview
Cluster Composition
- 3x Raspberry Pi 5 (8GB RAM each = 24GB total)
- Control Plane (pi-control):
- 256GB SD card (OS, logs, temp)
- 1TB M.2 NVMe SSD (high-performance workloads)
- Workers (pi-worker-1, pi-worker-2):
- 256GB SD card each (OS, logs, temp)
- NAS:
- Network storage (500GB+ allocated)
- Backup destination
Storage Tiers
Tier 1: NVMe SSD (1TB on pi-control)
Performance: ~600 MB/s read, ~600 MB/s write, <1ms latency (speed limited by Raspberry Pi HAT capabilities)
Best for:
- PostgreSQL databases (dev & prod)
- ScyllaDB clusters (dev & prod)
- Redis cache/persistence
- Build artifacts and CI/CD cache
- etcd cluster state
- Any workload requiring low latency and high IOPS
Kubernetes Storage Class: local-path-nvme
Key Advantage: 6x faster than SD cards, 6x faster than NAS over gigabit
Tier 2: NAS via NFS (500GB+)
Performance: ~110 MB/s read, ~90 MB/s write, ~5ms latency
Best for:
- Git repositories (large, infrequently written)
- Container registries (large images)
- Backup storage
- Application file storage
- Prometheus metrics (historical data)
- Ghost blog content
- Any data that needs to survive node failures
Kubernetes Storage Classes: nfs-client, nfs-db
Key Advantage: Shared across all nodes, survives cluster rebuilds, easy to back up
Tier 3: SD Cards (256GB × 3 = 768GB total)
Performance: ~90 MB/s read, ~50 MB/s write, ~10ms latency
Best for:
- Operating system
- System logs (rotated frequently)
- Temporary files
- Pod ephemeral storage
- Non-critical caches
Conclusion and Next Steps
Phase 1 was a great learning experience. I feel more confident in executing Claude’s plan, and how to work with Claude to troubleshoot and gain understanding of the services in my cluster. My observations noted earlier affirm my approach with AI to proactively question what was generated, and verify by reviewing the sources and logic along the way. My choice to lean into Claude for my technical needs, and Gemini as my content planning creative partner, continues to prove fruitful. They naturally fill in gaps while playing their respective roles.
More to come soon!
- The Spark: Imagining a Raspberry Pi 5 Cluster
- Part 1: Core Cluster Hardware Build and Initial Install
- Part 2: Services, Services, Everywhere!
- Part 3: The Final Layer - Hosting Ghost & The Great Migration